Google音声入力(voice input) で句読文字(punctuation marks)ができないけど。。。

This time I’m posting in English because I think this will only be useful for Japanese-as-a-second-language folks. So I often use the Google app for drafting texts/email by voice in Japanese. This is because I’m much better at speaking than writing in Japanese. But Google doesn’t have any speech punctuation like it does in English. For example, if Ⅰ’m dictating a text message in English and I’m ending an interrogative sentence I say, “question mark” and the correct punctuation appears. But in Japanese, if I say “hatena” into the microphone, Google prints the word, 「はてな」which is really annoying. So I usually dictate the entire message and then go back and hunt through it to add the missing brackets, commas, periods, and question marks.
I found this lovely blog post (http://nakamahalog.com) which explains how to use the Swype app as an ok workaround. 

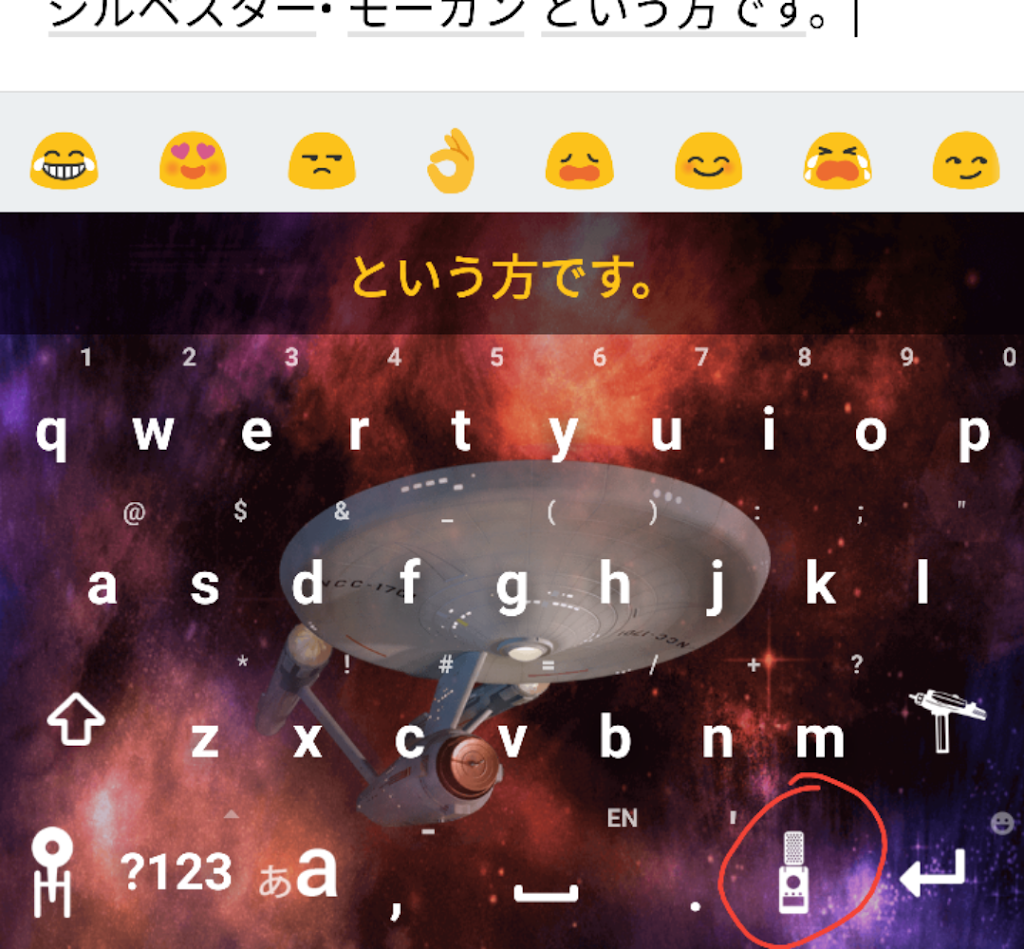
Swype keyboard with Star Trek skin. The microphone icon is a communicator.

BUT Swype wants a lot of permissions. I just switched off everything except Microphone. And I keep rotating my default keyboard in Settings, because they are basically tricky little keyloggers in my humble opinion.

The other problem was, I was saying the wrong words like “chon” for a period. nakamahalog also provides this handy chart of what to call all the punctuation marks when using Swype (and probably Google, whenever they get around to this functionality). I took the liberty of adding the yomikata below:

 [ 大かっこ開く dai kakko hiraku  ] 大かっこ閉じる dai kakko tojiru
 ‘ アポストロフィー aposutorofī  ◯ まる maru
 ▲ 黒さんかく kuro sankaku  : コロン  koron
 , コンマ  konma  – ダッシュ  dasshu
 ! 感嘆符/ビックリマーク/ kantan fu / bikkuri māku
エクスクラメーション・マーク ekusukuramēshon māku
 – ハイフン  haifun
. ピリオド/ドット piriodo / dotto  ? 疑問符/はてな gimon fu / hatena
 ” ダブルクオーテーション daburu kuōtēshon  ” ダブルクオーテーション閉じる daburu kuōtēshon tojiru
 ‘ クオーテーション kuōtēshon  ‘ クオーテーション閉じる kuōtēshon tojiru
 ; セミコロン semi koron  & アンド/アンパサンド ando / anpasando
 * アステリスク asuterisuku  @ アットマーク atto māku
 / スラッシュ surasshu  ^ キャレット kyaretto
 ・ 中黒 chū kuro  ° 度記号 do kigō
# シャープ shāpu  % パーセント pāsento
 _ アンダーバー/アンダースコア andābā / andāsukoa  | パイプ paipu
 $ ドル記号 doru kigō  ¢ セント記号 sento kigō
 £ ポンド記号 pondo kigō  € ユーロサイン yūro sain
 ¥ 円記号 en kigō  🙁 しかめっ面 shikamettsura
 🙂 スマイリー sumairī   😉 ウインク uinku
 ® 登録商標 tōroku shōhyō  > 大なり dai nari
 < 小なり  ko nari   – マイナス/引く mainasu / hiku
 x かける kakeru  + プラス/足す purasu / tasu
 ÷ わる waru  = イコール ikōru

Pythonプログラミングのような地形Udemy.com で

(Adapted from the original English post at https://studiozandra.com/tech-tangent-python-on-linux-here-we-go/ )
子供の時に 本 いっぱい読んで 将来に学科になるつもりだった。 高校に入ると 美術 にしたけど、 まだ掌篇小説(しょうへんしょうせつ)や詩を書いていた。 いろんな興味がいっぱいありすぎて しまった!
テクノロジーについてを読むのが大好き。 最近 Python というプログラミング 言語 を学ぼうとしてる。 ブートキャンプのような地形は 高すぎて できないので オンラインをコースを受けている。Udemy.com で “Complete Python Bootcamp: Go from Zero to Hero in Python” と言うコース 9.99ドル 登録 することができた。
Udemy パイソン コース

本気でやらないと思ってしまって Windows じゃなくて Linux でやろう とした。 それで一番最初の 段階で 困った。 このコースの中で ジュピター ノートブック(Jupyter Notebooks) という Web サービスを よく使うので、 インストールしないといけなかった。 アナコンダ というツール を使って、 ジュピターと Python 両方で インストールできて便利です。 そして Jupyter.org に行って ファイルをダウンロードして ダブルクリックした。 けどこういう赤い色のエラーが出てしまった。

問題は Linux ちゃんは text editor  でそのファイルを開こうとしてた。 ウェブ検索してから スタック エクスチェンジ stackexchange で正しい 仕方 を学んだ。

.sh ファイルを ターミナル(terminal)の中 そのダウンロードした ダイレクトリー に行って  chmod のコマンド をしないといけない。

それが終わってから 新しいターミナルを開いてjupyter notebook を書くと、 ブラウザタブが 自動的に 出て 自分の全部の ローカルフォルダ 見るようになった。

Python でコマンドを書いて Shift+Enter 起こしてすぐ ラン ができる。

もう一度日本語でブログ

ちょっと年取ったり違う国に住んだり 違う仕事を している状態になってるけど まだ 日本語 で遊んでいる。 今ハワイに住んでるので 日本語を使う経験 は すごい 増やした。 話すのはあまり問題ないけど帰ったり読んだりするのがまだ難しいです ので もうちょっと練習しなきゃいけない と思った。 日本語の辞典 ウェブサイトとアプリ。。。

http://ejje.weblio.jp/

http://takoboto.jp/
https://www.facebook.com/pages/Takoboto/257922567700189

。。。を 使って これから 書きます!

PART 2: Symantec エンクリプション・デスクトップHDDをリカバーする

既に インストール ができた . 次は public  キー と secret キー インポートする 。
セットアップ  アシスタント というウィザード の 窓の 左側 を見たら、ユーザータイプ と言う 部分 がある 。
 そこでニューユーザーじゃなくて、  existing keys を選んだ 。プロンプト の流れ で .pkr と .skr ファイルのフォルダー を選んだ。
そして彼女の古いハードドライブ を S ATA ケーブル で 繋いだから 「enter passphrase to access disk」っていうメッセージが出た。 私は視線をそらしながら 彼女がパスワードを入れてそのHDのホールダが段々出てきた!!🙌
~fin~
English post at Symantec Connect Forums:
This community for the most part already knows that Symantec PGP Desktop was replaced by Symantec Encryption Desktop, but to someone encountering this software for the first time, this is not obvious. Clicking a Symantec Trialware link, the very next page is a registration form, and then a download for Symantec Endpoint Encryption TW. So as a layperson, I assume that the old PGP product name was changed to SEE, click “download,” and struggle to install the thing. After finally installing .NET, the dependent SEE Mgr and MSI, then the Client in serverless mode, I hit a brick wall. Going back to the forums it was dawning that NONE of the 3 packages I’d downloaded was the right one. Another commenter had posted the correct link and I finally downloaded the SED trialware but it wouldn’t execute, and so I posted the previous questions.

Meantime I started looking into other workarounds, wondering, “Is Symantec PGP Desktop  proprietary encryption? Or, as long as I have the keys and passphrase, can I use any software on any platform to decrypt?” I read the Wikipedia entry on PGP and confirmed I’d gotten the software names confused (easy to do!)
I did another Google search regarding the SED installer which would not open: I think the registry might have been corrupted by the brute uninstall of the SEE Client, so I tried 64-bit on a different laptop and it opened and installed fine!
Then there was the problem of the license key…
At first, like these commentors, I thought there was no way to activate using the product key I received in my trial email.  
The “thank you for trying SEE (confusing wrong product name again)” email sends a temporary product key that is too long to fit in the allotted spaces. A video instructionn said to paste the whole thing, but I was on a separate machine from my email, so I just typed.  But it worked — just cut the key in half and copy the latter half of digits only. (They email you a 12-segmented license key, but only use the last 6 segments.)
After installing and licensing, in the User Type section don’t select New User. Rather, select Existing Key option. Then follow the prompts to browse to the directory containing your original .pkr and .skr files. We plugged in the old HD with a SATA USB cable and a pop-up appeared “Enter passphrase”. So we were able to recover all her data.
(In case anyone else comes across this same situation — that is, having keys and passphrase but cannot get an old copy of PGP Desktop or a working trial copy of SED — try looking into other software, such as GPG Suite (Mac) or GNU Privacy Guard (GnuPG, Linux) for recovery. See this discussion: https://gpgtools.tenderapp.com/discussions/problems/964-migrating-from-pgp-to-gpg-import-private-key
and this https://www.dewinter.com/gnupg_howto/english/GPGMiniHowto.html#toc3.3 (Import key, no graphical interface though)
Maybe even try to import the key into the old PGP Desktop for Windows? **I cannot vouch for this site bc I haven’t tried it!** https://pgp.en.softonic.com/?ex=DSK-347.2
Perhaps someone more knowledgeable could comment on this ‘decrypt by importing keys into other software’ option.)

Yes, I’m sewing!

So “vents” are apparently slits. By process of elimination and also by process of tearing out my hair for hours, I’ve deciphered my first garment pattern.tmp_30304-20170116_2252001827235078

Special thanks to YouTube and the rest of the interwebs for helping me unlock the jargon of “Simplicity” New Look 6312.

tmp_30304-20170120_200153995085439

Ok, I admit, I chose the wrong pattern for my first project, what a newbie, indeed! But it came out not too shabbily!

Next I made not one, but TWO little zipper pouches. Again, YouTube gets my gratitude and praise: The Crafty Gemini has some great tutorials.

tmp_30304-20170204_181627-1773062498

My first zippered pouch, made using my own fabric design as well (Koi Pond)
tmp_30304-20170206_084532-1551846038

Second pouch, made with fusible this time instead of quilting

What to make next? I have a few precious swatches of my own Spoonflower designs, but they are on the smallish side. The tutorial hunt begins anew!

Taniku shokubutsu

Taniku shokubutsu, or “spoiled child”, according to Weblio‘s definition of the word “succulents” in Japanese:

translation of succulent in Japanese

I guess a spoiled child would probably be ta-niku (have plenty of meat)!

I had absolutely no IDEA about the succulent-verse online until I photographed the adorable little things as I was walking one day. Peeps are real serious about these plump plants! Using the PRISMA app, I made a colorful fabric pattern out of some little succies I photographed while walking near Date Street in Honolulu, HI.

Succulents Date Street Honolulu, HI

Then using the Prisma app on my phone, I applied different filters to the photo:

screenshot_2016-11-05-11-53-58

Then I took a screenshot of my phone and opened it in Photoshop (CS5, version 12.0). You can also save the photo or e-mail it to yourself. (Prisma cropped my photo so I had to run it twice, once on each side of the photo.)

screencaps

After cropping out the phone stuff and the app, I aligned and joined the 2 halves of the photo together into 1 layer. Then I made a backup, duplicate of the entire layer and turned it off, just in case I messed up later.

Next I used the Lasso tool to duplicate a few flowers. I just traced around the edges of a flower and Copied as New Layer a few times, until I had a few extra flowers to be used later as ‘filler’.

photoshopscreencap2

Then I used the Offset filter (select menu Filter>Other>Offset) to turn the picture into a repeat with four corners.

repeat using offset filter
Offset filter applied. Now just gotta fill in the center area with some filler flowers.

Using my new flower copies, I filled in the blank space in the center where the four corners meet. Then I used the Smudge tool to blend the four corners together.

smudge-to-join

I think it came out pretty well, don’t you?

Artistic Process – Where Cool Pillows Come From

I grew a few gray hairs creating this Cosmic Damask fabric pattern, but it was way worth it! From pencil sketches, scanning, and then repeat process. You’ll need some tracing paper for this, unless you prefer using a drawing app with a digital stylus.

First, I scoured the web for a nice old damask pattern. Here’s what a quick search might turn up — almost any of these will do the trick:

damask-image-search

Now print out the damask pattern you just found. Print on regular paper, in a size that is easy for tracing.

Lay the tracing paper over the damask printout. Now this is where your artistic vision and skill come in! Think of a theme and start filling in the damask area with your own doodles, like mine below:

cosmicdamask-002

You can scan the tracing paper and continue to work on it in your photo editor software.

showprocess

Or, you can do a repeat pattern by hand on paper, old school style. (madamchino on Instagram)

The only activity I ever enjoyed more than drawing…

…was reading, back when library cards were blue cardboard squares. It took me on quite a long detour in life, as instead of continuing fine art after LaGuardia HS, I ended up majoring in English.

The third page of my newest pad of paper was devoted to words, and the word “word”. Literally, kotoba, in Japanese, and in shining fuchsia, purple, and red. UPDATE: Customizable prints are here via Zazzle. Add your name, a greeting, etc.

UPDATE 7 June 2019: I’ve closed my Zazzle store due to their April 2019 change of policy. My Redbubble store is still open here: https://www.redbubble.com/people/studiozandra/portfolio/recent

A trip to Sam Flax on Third Avenue in Manhattan turned up yet another silky surface for pens — Borden and Riley #234 Bleedproof Paris Paper For Pens 11X14. It’s 108 lb weight, rich and heavy and the pens just dance across its surface. I highly recommend spending some time with this paper. Use caution when erasing pencil guidelines after inking, though; you will pick up some color if not thoroughly dry, and if you favor kneaded erasers, use a fresh one to avoid smudging.