Just created a new npm package for installing an AI chat widget, and I got excited for a moment because I thought, “it’s already being downloaded!?”
…after barely 48 hours.
Then I realized that it had to be scrapers. The irony of bots downloading a chatbot package makes me chuckle!
Anyway, the package was created for entrepreneurs using Svelte and BetterAuth. Entrepreneurs in a course at Nucamp use a starter repo to get their SaaS apps going, and the chatbot works with that stack.
I did a lot of it by vibe coding with Claude Code. Since Claude Code came out, there are so many old ideas I want to revisit or old projects I want to refactor! There’s just not enough time. But in this case I was able to quickly build something useful for budding entrepreneurs.
It’s scary posting something live, and we’ll see if I’m up to the job of maintainer! But it certainly has been a mostly fun process so far. If you’re reading this, please give the installation a shot in your Svelte-BetterAuth project, and let me know if you run into any issues!
IMPORTANT NOTE: This script will analyze the email, determine which reply from a set of templates is most appropriate, then customize that reply as needed for that particular customer/inquiry, adding in the customer’s name and adding your desired email signature. Then it will forward that generated reply back to you at the same address, for human review (as in-line text). You still need to then send the generated reply, it will NOT do the sending for you.
So we’ve refined the previous script a bit to add a JSON file full of reply templates. Now there’s a JSON added to the template literal prompt for {templateOptions}, which is then passed to the LLM.
The context size is increasing but the tradeoff is that we are getting increased functionality from our auto-responder (only intended for nuisance, non-sensitive emails or in line with your company security policy):
// Global variable to cache the loaded reply templates to avoid re-reading the file on every function call.
var cachedReplyTemplates = null;

/**
 * Main function to process forwarded emails.
 */
function processForwardedEmails() {
  try {
    console.log("Starting email processing...");

    var allThreads = [];
    var start = 0;
    var maxBatch = 100; // Process 100 threads at a time

    // Search for UNREAD emails that don't have "AUTOMATED REPLY" in the subject
    var searchQuery = 'is:unread -subject:"AUTOMATED REPLY"';

    do {
      var threads = GmailApp.search(searchQuery, start, maxBatch);
      allThreads = allThreads.concat(threads);
      start += threads.length;
      console.log("Found " + threads.length + " unread forwarded threads in batch, total " + allThreads.length);
    } while (threads.length === maxBatch);

    console.log("Total threads to process: " + allThreads.length);

    for (var i = 0; i < allThreads.length; i++) {
      var thread = allThreads[i];
      var messages = thread.getMessages();
      var latestMessage = messages[messages.length - 1];

      console.log("Processing email " + (i + 1) + ": " + thread.getFirstMessageSubject());
      console.log("From: " + latestMessage.getFrom());
      console.log("Is unread: " + thread.isUnread());

      // Extract original subject from the forwarded email content
      var originalSubject = extractOriginalSubject(latestMessage.getPlainBody(), thread.getFirstMessageSubject());
      console.log("Original subject: " + originalSubject);

      // Generate reply using Gemini
      console.log("Generating reply...");
      var reply = generateReply(latestMessage.getPlainBody());
      console.log("Reply generated, length: " + reply.length);

      // Send the generated reply back to you for review
      console.log("Sending reply to self...");
      sendReplyToSelf(originalSubject, latestMessage.getPlainBody(), reply);
      console.log("Reply sent!");

      // Mark as read, but DO NOT archive the email
      thread.markRead(); // First, mark as read
      console.log("Email marked as read.");
    }

    console.log("Processing complete!");
  } catch (error) {
    console.log("Error: " + error.toString());
    console.log("Stack trace: " + error.stack);
  }
}

/**
 * Extracts the original subject from a forwarded email's body.
 * @param {string} emailBody The plain text body of the email.
 * @param {string} forwardedSubject The subject of the forwarded email from Gmail.
 * @returns {string} The extracted original subject.
 */
function extractOriginalSubject(emailBody, forwardedSubject) {
  // Try to find "Subject:" in the forwarded email body
  var subjectMatch = emailBody.match(/Subject:\s*(.+)/i);

  if (subjectMatch && subjectMatch[1]) {
    return subjectMatch[1].trim();
  }

  // Fallback: remove "Fw:" or "Fwd:" from the Gmail subject
  var cleanedSubject = forwardedSubject.replace(/^(Fw:|Fwd:)\s*/i, '').trim();
  return cleanedSubject;
}

/**
 * Loads reply templates from the 'replies.json.html' file.
 * Caches the templates after the first load for efficiency.
 * @returns {object} An object containing the reply templates.
 */
function loadReplyTemplates() {
  if (cachedReplyTemplates === null) {
    try {
      var jsonString = HtmlService.createTemplateFromFile('replies.json').evaluate().getContent();
      cachedReplyTemplates = JSON.parse(jsonString);
      console.log("Reply templates loaded from replies.json.html");
    } catch (e) {
      console.error("Error loading or parsing replies.json.html: " + e.message);
      throw new Error("Failed to load reply templates. Please ensure 'replies.json.html' exists and contains valid JSON.");
    }
  }
  return cachedReplyTemplates;
}

/**
 * Generates a reply using the Gemini API, selecting from a set of pre-defined templates.
 * @param {string} emailBody The plain text body of the email to respond to.
 * @returns {string} The customized reply generated by Gemini.
 */
function generateReply(emailBody) {
  try {
    // IMPORTANT: Ensure you have your GEMINI_API_KEY set in Script Properties (File > Project properties > Script properties)
    var apiKey = PropertiesService.getScriptProperties().getProperty('GEMINI_API_KEY');

    // Ensure API Key is available
    if (!apiKey) {
      throw new Error("GEMINI_API_KEY is not set in Script Properties.");
    }

    // Load all available reply templates
    var templates = loadReplyTemplates();

    // Convert templates object to a string for the prompt
    // This provides Gemini with the full list of options and their content
    var templateOptions = JSON.stringify(templates, null, 2); // Pretty print for readability for AI

    var prompt = `You are an email assistant for TechCorp Solutions. Your task is to select the most appropriate pre-written reply template based on the content of the email and then customize it.

Here are the available reply templates, identified by their keys:
${templateOptions}

Instructions:
1.  **Analyze the "EMAIL TO RESPOND TO" carefully.**
2.  **Determine which of the provided templates is the best fit for the email's intent.**
3.  **Extract the sender's first name, product/service name (if mentioned, otherwise "not specified"), and company name (if mentioned, otherwise "not specified") from the email.**
4.  **Populate the chosen template's placeholders ({customerName}, {productName}, {companyName}, etc.) with the extracted information.** If a placeholder's information is "not specified", omit that part of the sentence or use a polite general phrase where applicable.
5.  **If no template is a good fit, respond with "noMatch".** In this case, provide a polite generic response that asks for more information.
6.  If the email is clearly not about the specific topic of the chosen template, politely redirect them to use the standard template but mention their specific topic.

EMAIL TO RESPOND TO:
${emailBody}

YOUR RESPONSE FORMAT:
Chosen Template Key: [Key of chosen template, or 'noMatch']
Customized Reply: [The full customized reply based on the chosen template and extracted info, or the generic response if 'noMatch']

Example of expected output if a template is chosen:
Chosen Template Key: pricingRequest
Customized Reply: Hello John, Thank you for your interest in our cloud hosting services. Our pricing starts at $99/month for the basic plan and $299/month for premium features. I'll send you a detailed quote within the next business day. You can also view our pricing at www.techcorp.com/pricing. Best regards, Sales Team

Example of expected output if customer name is not specified:
Chosen Template Key: generalInquiry
Customized Reply: Hi there, Thank you for reaching out to TechCorp Solutions. We have received your inquiry and will respond within 24 hours. For urgent matters, please call our support line at 555-0123. Best regards, Customer Service Team

Example of expected output if 'noMatch' is chosen:
Chosen Template Key: noMatch
Customized Reply: Dear Sender, thank you for your email. To assist you further, please provide more details about your inquiry.

---
Chosen Template Key:`; // Start the prompt to guide Gemini's output format

    var payload = {
      'contents': [{
        'parts': [{
          'text': prompt
        }]
      }]
    };

    var options = {
      'method': 'POST',
      'headers': {
        'Content-Type': 'application/json',
      },
      'payload': JSON.stringify(payload)
    };

    var response = UrlFetchApp.fetch(
      `https://generativelanguage.googleapis.com/v1/models/gemini-1.5-flash:generateContent?key=${apiKey}`,
      options
    );

    var data = JSON.parse(response.getContentText());

    if (data.candidates && data.candidates[0] && data.candidates[0].content) {
      var geminiOutput = data.candidates[0].content.parts[0].text;

      // Parse Gemini's structured output
      var lines = geminiOutput.split('\n');
      var chosenKey = '';
      var customizedReply = '';

      for (var i = 0; i < lines.length; i++) {
        if (lines[i].startsWith('Chosen Template Key:')) {
          chosenKey = lines[i].replace('Chosen Template Key:', '').trim();
        } else if (lines[i].startsWith('Customized Reply:')) {
          customizedReply = lines[i].replace('Customized Reply:', '').trim();
          // Concatenate remaining lines if the reply spans multiple lines
          for (var j = i + 1; j < lines.length; j++) {
            customizedReply += '\n' + lines[j].trim();
          }
          break; // Stop after finding the reply
        }
      }

      if (chosenKey === 'noMatch') {
        console.log("Gemini determined no suitable template. Generic reply generated.");
        return customizedReply; // Return the generic response
      } else if (templates[chosenKey]) {
        console.log("Gemini chose template: " + chosenKey);
        // Gemini is now responsible for populating the variables within the 'Customized Reply'
        return customizedReply;
      } else {
        console.warn("Gemini suggested an unknown template key: " + chosenKey + ". Returning generic error reply.");
        return "Error: Gemini suggested an invalid template or failed to choose. Please check manually.";
      }

    } else {
      // Log more details if the Gemini API response is not as expected
      console.log("Unexpected Gemini API response structure: " + JSON.stringify(data));
      return "Error generating reply - please check manually";
    }

  } catch (error) {
    console.log("Gemini API error: " + error.toString());
    return "Error generating reply: " + error.toString();
  }
}

/**
 * Sends the generated reply back to your specified email address for review.
 * @param {string} originalSubject The subject of the original forwarded email.
 * @param {string} originalBody The plain text body of the original forwarded email.
 * @param {string} generatedReply The reply generated by Gemini.
 */
function sendReplyToSelf(originalSubject, originalBody, generatedReply) {
  var subject = "AUTOMATED REPLY: " + originalSubject;
  var body = "Generated Reply:\n" + generatedReply + "\n\n--- Original Email ---\n" + originalBody;

  // Send to your review email address
  GmailApp.sendEmail("admin@techcorp.com", subject, body);
}
And the JSON file has camelcase keys representing a bunch of customer scenarios, with the potential responses as values.
{
  "generalInquiry": "Hi {customerName}, Thank you for reaching out to TechCorp Solutions. We have received your inquiry and will respond within 24 hours. For urgent matters, please call our support line at 555-0123. Best regards, Customer Service Team",

  "pricingRequest": "Hello {customerName}, Thank you for your interest in our services. Our pricing starts at $99/month for the basic plan and $299/month for premium features. I'll send you a detailed quote within the next business day. You can also view our pricing at www.techcorp.com/pricing. Best regards, Sales Team",

  "supportTicket": "Hi {customerName}, We've received your support request (Ticket #{ticketNumber}) and our technical team is reviewing it. Expected response time is 4-6 hours during business days. You can track your ticket status at www.techcorp.com/support. Thanks, Technical Support",

  "partnershipProposal": "Dear {partnerName}, Thank you for your partnership proposal. We appreciate your interest in collaborating with TechCorp. Our partnerships team will review your submission and respond within 5-7 business days. Regards, Business Development Team",

  "jobApplication": "Hello {applicantName}, Thank you for applying for the {positionTitle} role at TechCorp. We have received your application and will review it with our hiring team. If your qualifications match our needs, we will contact you within two weeks. Best wishes, HR Department",

  "vendorInquiry": "Hi {vendorName}, Thank you for introducing your services to TechCorp. We are currently evaluating our vendor relationships and will reach out if we have a need that matches your offerings. Please keep us updated on your services quarterly. Thanks, Procurement Team",

  "mediaRequest": "Hello {reporterName}, Thank you for your media inquiry. Our PR team will review your request and respond within 48 hours. For urgent press matters, please contact our media hotline at 555-0199. Regards, Public Relations Team",

  "refundRequest": "Dear {customerName}, We have received your refund request for order #{orderNumber}. Our billing department will process this within 3-5 business days and send you a confirmation email. If you have questions, please contact billing@techcorp.com. Customer Care Team",

  "scheduleMeeting": "Hi {contactName}, Thank you for requesting a meeting. Please use our scheduling link to book a convenient time: www.calendly.com/techcorp-meetings. Available slots are Monday through Friday, 9 AM to 5 PM EST. Looking forward to speaking with you, Sales Team",

  "productFeedback": "Hello {customerName}, Thank you for taking the time to share your feedback about {productName}. Your insights help us improve our products. Our product team will review your suggestions for future updates. We appreciate your continued support, Product Team",

  "serviceNotOffered": "Hi {customerName}, Thank you for your inquiry about {requestedService}. Unfortunately, TechCorp does not currently offer this service. We specialize in cloud infrastructure and software development solutions. You might want to try reaching out to companies that focus specifically on {serviceCategory}. We appreciate your interest, Customer Service Team",

  "unsolicitedAdvertising": "Hello, Thank you for reaching out. TechCorp is not interested in {advertisedProduct} at this time. Please remove our email address from your mailing list and do not send us further promotional materials. If you continue to contact us after this request, we will report it as spam. Regards, TechCorp Administration"
}
To try this if you haven’t already from my previous part 1 post, go to https://script.google.com/home and add a new project (you can make a new Gmail account just for forwarding). Then, add a new script. In the Code.gs file, paste this into the editor window. Then add another script and name it ‘replies.json.html’, pasting in the JSON file.
Inside the Code.gs script, go to the sendReplyToSelf() function and replace the dummy email with your own email address where you will review the generated messages.
Your Gemini API key can be entered in https://script.google.com/home/projects under Settings. Run a test by forwarding an email to this new Gmail address, then click the “Run” button at the top of the code editor page. You should see the execution log at the bottom for any errors.
After confirming that it’s working, of course you’ll want to replace the dummy scenarios in the JSON file with your own frequently-encountered scenarios. It’s a lot of work to type out each one, so perhaps ask an AI to edit the JSON using your company FAQ, or your Zendesk help center documentation, etc.
You can also add fallbacks to another API, like OpenAI for example, in case Gemini is too overloaded. Just add an additional key inside your Apps Script settings page:
function generateReply(emailBody) {
  var prompt = buildPrompt(emailBody);

  // 1. Try with Gemini first (primary AI)
  var geminiReply = callGeminiApi(prompt);

  if (geminiReply !== "ERROR_GEMINI_OVERLOADED") {
    // If Gemini didn't fail with a 503, return its response (or any other error)
    return geminiReply;
  }

  // 2. If Gemini is overloaded, try with OpenAI (fallback AI)
  console.warn("Gemini is overloaded. Attempting to use OpenAI as a fallback...");
  var openAiReply = callOpenAiApi(prompt);

  if (openAiReply.startsWith("ERROR_")) {
    console.error("OpenAI fallback also failed. Error: " + openAiReply);
  } else {
    console.log("Successfully generated reply with OpenAI fallback.");
  }

  // Return the OpenAI response, whether it's a success or an error
  return openAiReply;
}
How to Deploy after Testing
You might notice that you need to manually run this app or that the timing trigger will stop working after a certain interval — this is because the app needs to be properly deployed.
From inside the Google Apps Script code editor, you’ll see a “Deploy” button in the upper-right of the screen — click that.
Then Select “API Executable” as the Deployment Type. Restrict access to yourself only.
Have you used this or other email automation? Please do let me know what’s working for you, or if you need help setting this up!
Vibe-code the tools you need to move projects forward. For example, a prompt generator for creating feature prompts. Instead of typing out, “Add a MUI React component dark-mode toggle, depicting a sun and moon icon,” along with the relevant guiding code snippets, have make a list of all sprint cycles and have an LLM extrapolate the prompts and put them into md files for you:
Tired of generating prompts? Build your own prompt generator.
Here’s a glance at the directory structure:
Here’s a share of my initial prompt to get things started:
Many people are unaware that ChatGPT is remembering aspects of their conversations, and building a profile on the user.
This can be good if you hate repeating yourself, or bad if you feel some kinda way about privacy.
image from OpenAI
Open your ChatGPT page or app, and control ChatGPT’s memory!
Either…
Directly in the conversation: You can tell ChatGPT to remember something by explicitly stating it, or you can ask it what it remembers to review or modify its understanding.
In settings: Navigate to Settings > Personalization > Manage Memory to view, delete, or clear all memories.
For more info and recent updates, check out the official article from OpenAI. Claude also now allows users to enter personalization information under Account > Settings > Profile. For Gemini, chats are remembered for a specified time (currently 18 months) unless you go in and delete each one. However there is also an area to enter specific details about your life for Gemini to remember across all chats, under Settings & help > Saved info.
Rolling out to Queens businesses now, with the broader New York area access coming soon
The best time to get started with AI was perhaps a few years ago.
The second-best time is now!
That’s what I’m sharing with female founders, women in business, and women-owned businesses in Queens, NY. The takeaway is — if you haven’t used AI tools to save you at least 2-10 hours of work per week yet, now’s your time!
I’ve been teaching a variety of topics for the past 14 years, so empathy, virtual tools, and teaching with metaphors, visual aids, and patience is my jam. I’m so happy to bring you into the world of AI tools and delegate those painful tasks you dread each week to your new AI assistant.
Is it invoicing? Marketing? Customer follow-up? Or just writing plans and proposals or reviewing lengthy contracts?
AI can help you save time and money. Book your consultation with me now to learn more (psst… it’s free).
Well, I got the main partition resized thanks to this blog post. It was turning off things like hibernation and system restore. Then I shrank the Windows partition down to about 98 GB. Take that, Windows!
Still can’t get rid of the obnoxious logo
After a reboot, it was pretty smooth sailing. After installing the proprietary NVIDIA drivers and restarting with a special pin entered from the boot partition, I restarted again. However, I got the error “Nvidia kernel module missing, falling back to nouveau” no matter what I tried.
So I started thinking I would need to install Arch Linux, as it seems to support NVIDIA drivers well. But another contender emerged: Pop!_OS. Yes, of system76 fame. I had heard of it many times but never tried it.
I made another live USB stick and split the Fedora partition in half, installing Pop!_OS (Secure Boot needs to be shut off otherwise the live USB likely won’t start).
Lo and behold, it worked out of the box. The keyboard backlighting can be controlled with the function keys just fine, although I haven’t tried changing the colors yet. Pop!_OS even wakes from suspend after lid close, something that I’ve seen fail many times on other OSes.
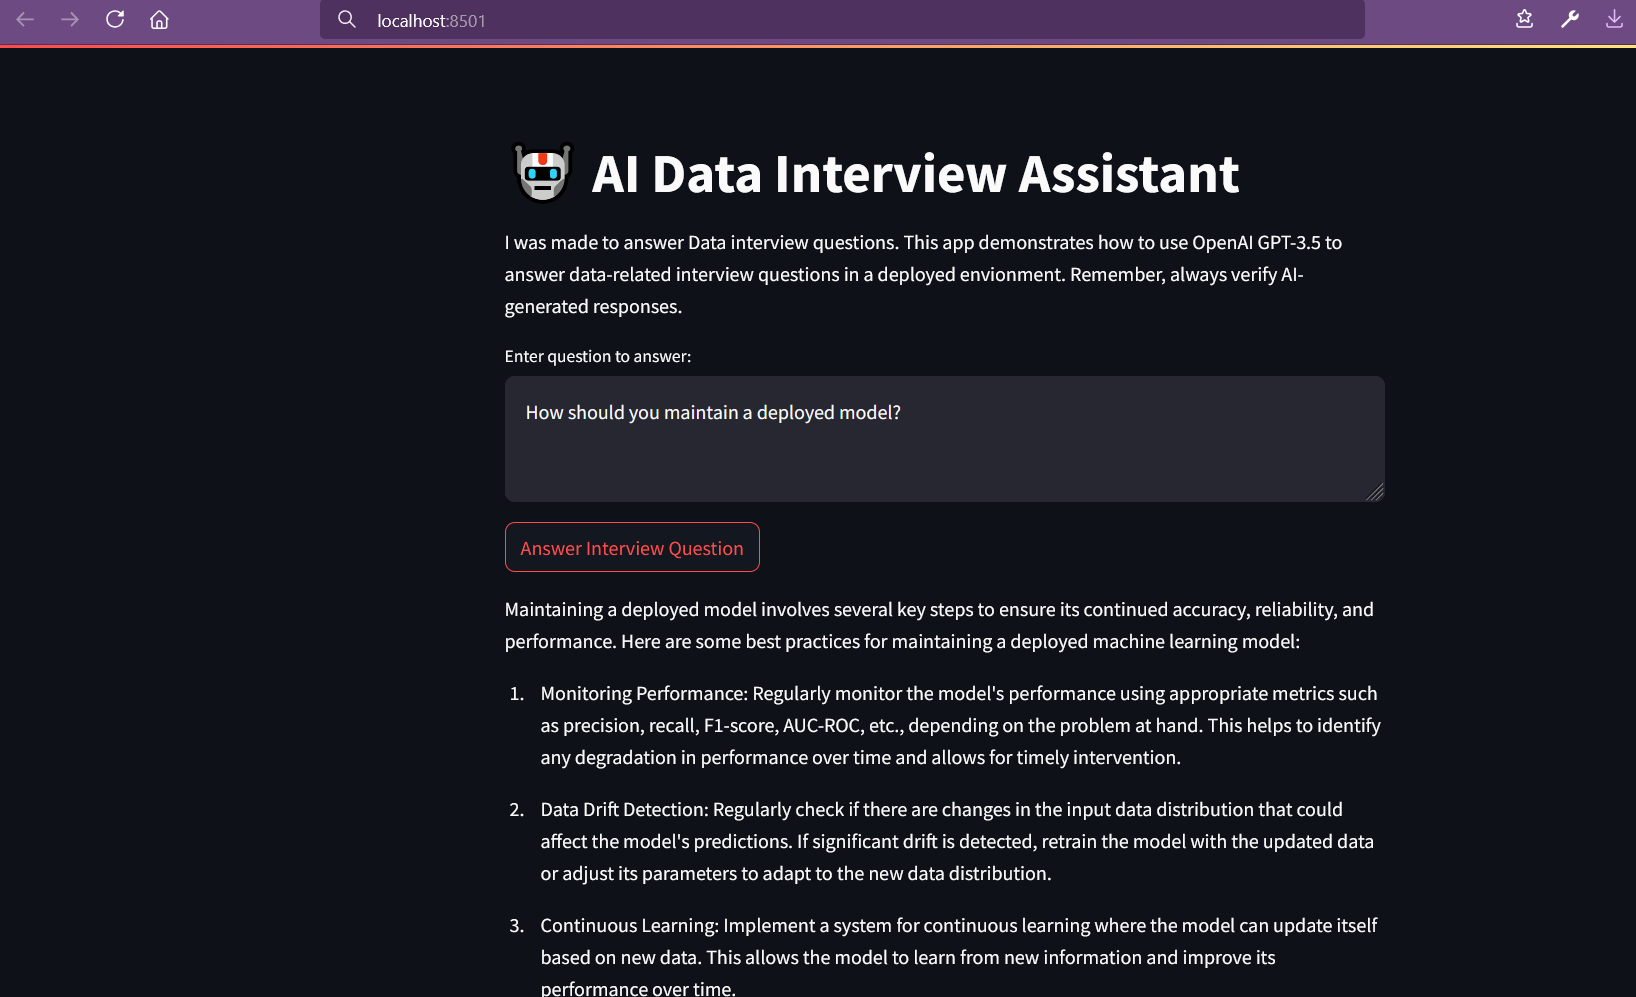
Taking a fun course with Lonely Octopus, I’ve been learning how to use pandas to clean data for analysis, and also how to quickly build a proof of concept/MVP using Streamlit.
Installing Streamlit locally on Windows in Gitbash threw an error:
$ pip install streamlit
WARNING: Failed to write executable - trying to use .deleteme logic
ERROR: Could not install packages due to an OSError: [WinError 2] The system cannot find the file specified: 'C:\Python311\Scripts\watn311\Scripts\watchmedo.exe.deleteme'
“Watchmedo”? Sounded like malware. I got scared and shut off my wifi for a sec. Then I calmed down and decided to run it in a venv instead. Created the venv:
$ python -m venv myenv
Then activate it (I’m using Gitbash for my shell):
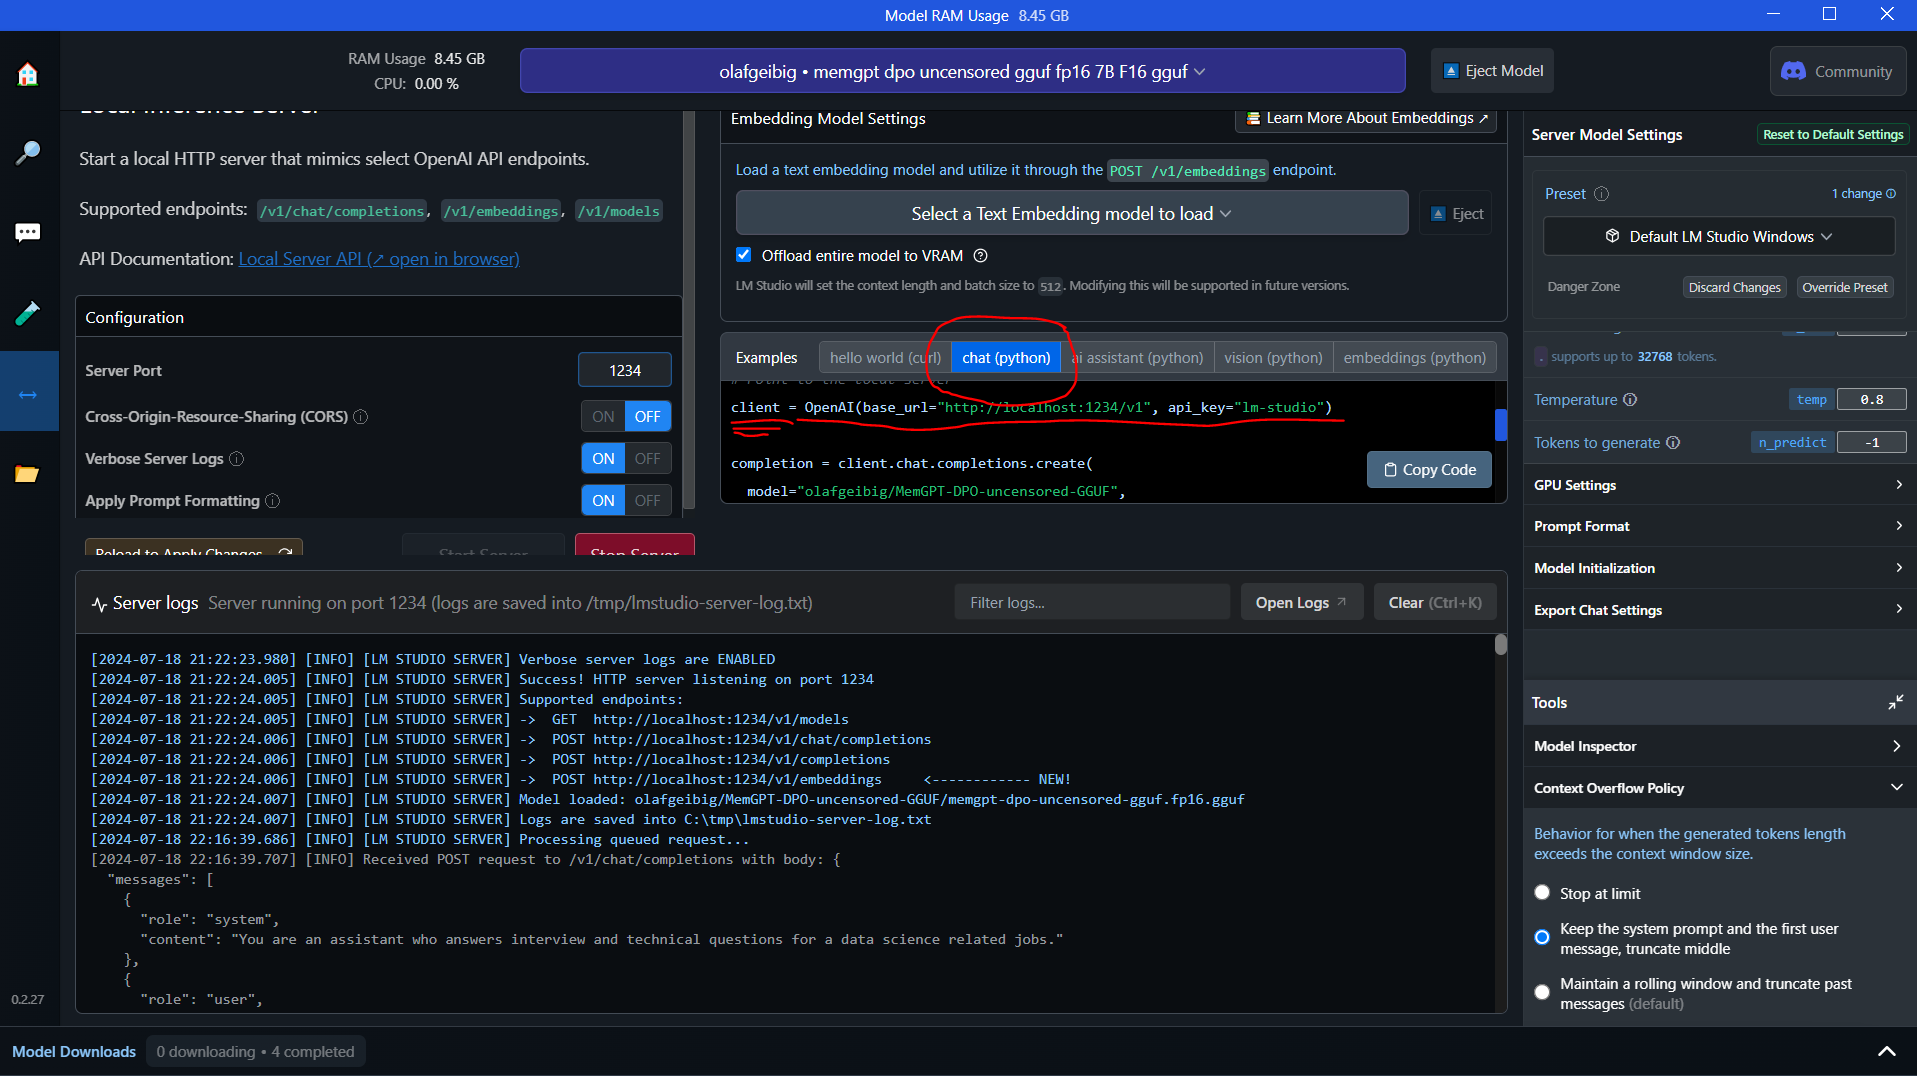
Paste that into your Streamlit app.py file, replacing the ‘client’ variable. Make sure the model is loaded up, and that the server is running.
There are tons of settings to consider inside LM Studio. You also need to have enough memory to run the models! LM Studio’s Discord server is a good place to learn more.
I’ve been giving free resume reviews on a couple of Discords for a few months now. Seeing some patterns appear — people are bemoaning the ghosting and the fake job posts, but still using the same approach and blaming their resumes.
So I made a video on the importance of and how to follow up after applying, with a human!
This is one thing I wish I would have learned earlier in my own career. We spent so much time “pounding the pavement” years ago, only to be told by some receptionist to “go to the website” in order to apply. We were trained to apply online, apply online, apply online. And just sit back and wait for the response!
In this video I explain how to actually follow up with a company once you’ve applied.
Looking for a cute set of progress bars for my app, I searched around and found a great blog post with a few examples. Originally I had zero intention of using animated progress bars, but they seemed to fit well enough for my needs and actually added a bit of, dare I say, pizazz, to the page.
So I go to play around with the code… aaand it’s jQuery.
facepalm, the other Picard maneuver
On a positive note, usually I can tell what’s going on in jQuery, as if reading psuedocode. It feels sort of like guessing what a Spanish billboard says as an English speaker (to me, anyway). I suppose the faster way to move forward with my project would have been to just import some jQuery via CDN, but I decided that I wanted to fully understand what was going on, and thus decided to rewrite it in plain JavaScript.
“Mayhaps, in the span since first we met, an AI hath vanquished thee, mighty jQuery,” I said to my screen as I Googled “jQuery to JavaScript converter.”
Surprisingly, there was a tool which actually did something, or enough to get me started. Despite some very strange copy on their page, the WorkVersatile converter did deliver on their promise of only “some errors” after conversion.
Pivotal‘s free tier might be just what you need to get started or re-energize your side project.
Combining Pivotal’s project management software with pomofocus.io — those two tabs in my browser have really boosted my output and kept me organized. So far, the free tier of Pivotal Tracker has been enough to get my little project off the ground, so I thought it might be helpful to share.
You create an account and then name your project. Then you can add user stories or features which you eventually plan on adding to your app or site (your product roadmap).
Adding these features is pretty simple, and you can put as much detail as you like.
The Pivotal dashboard shows you an estimated project schedule, status, and backlog
Working solo, some of the features like “Accept”/”Reject” buttons aren’t really useful (think: pull request meme of awarding oneself a medal). Also, I’m not quite clear on the project velocity calculation, which seems like a powerful feature that I’m not taking full advantage of at the moment (here’s a 2-year-old video explaining the velocity calc feature, or you can actually — shudder — read the docs). Other than that it’s pretty amazing for my needs. And it’s nice to know that I can still have up to 5 users should I need to bring on help.
This sort of freemium app is really enabling a lot of startup and small business innovation, since a lot of side projects don’t generate income at first. I hope to pass it along with a freemium app of my own!