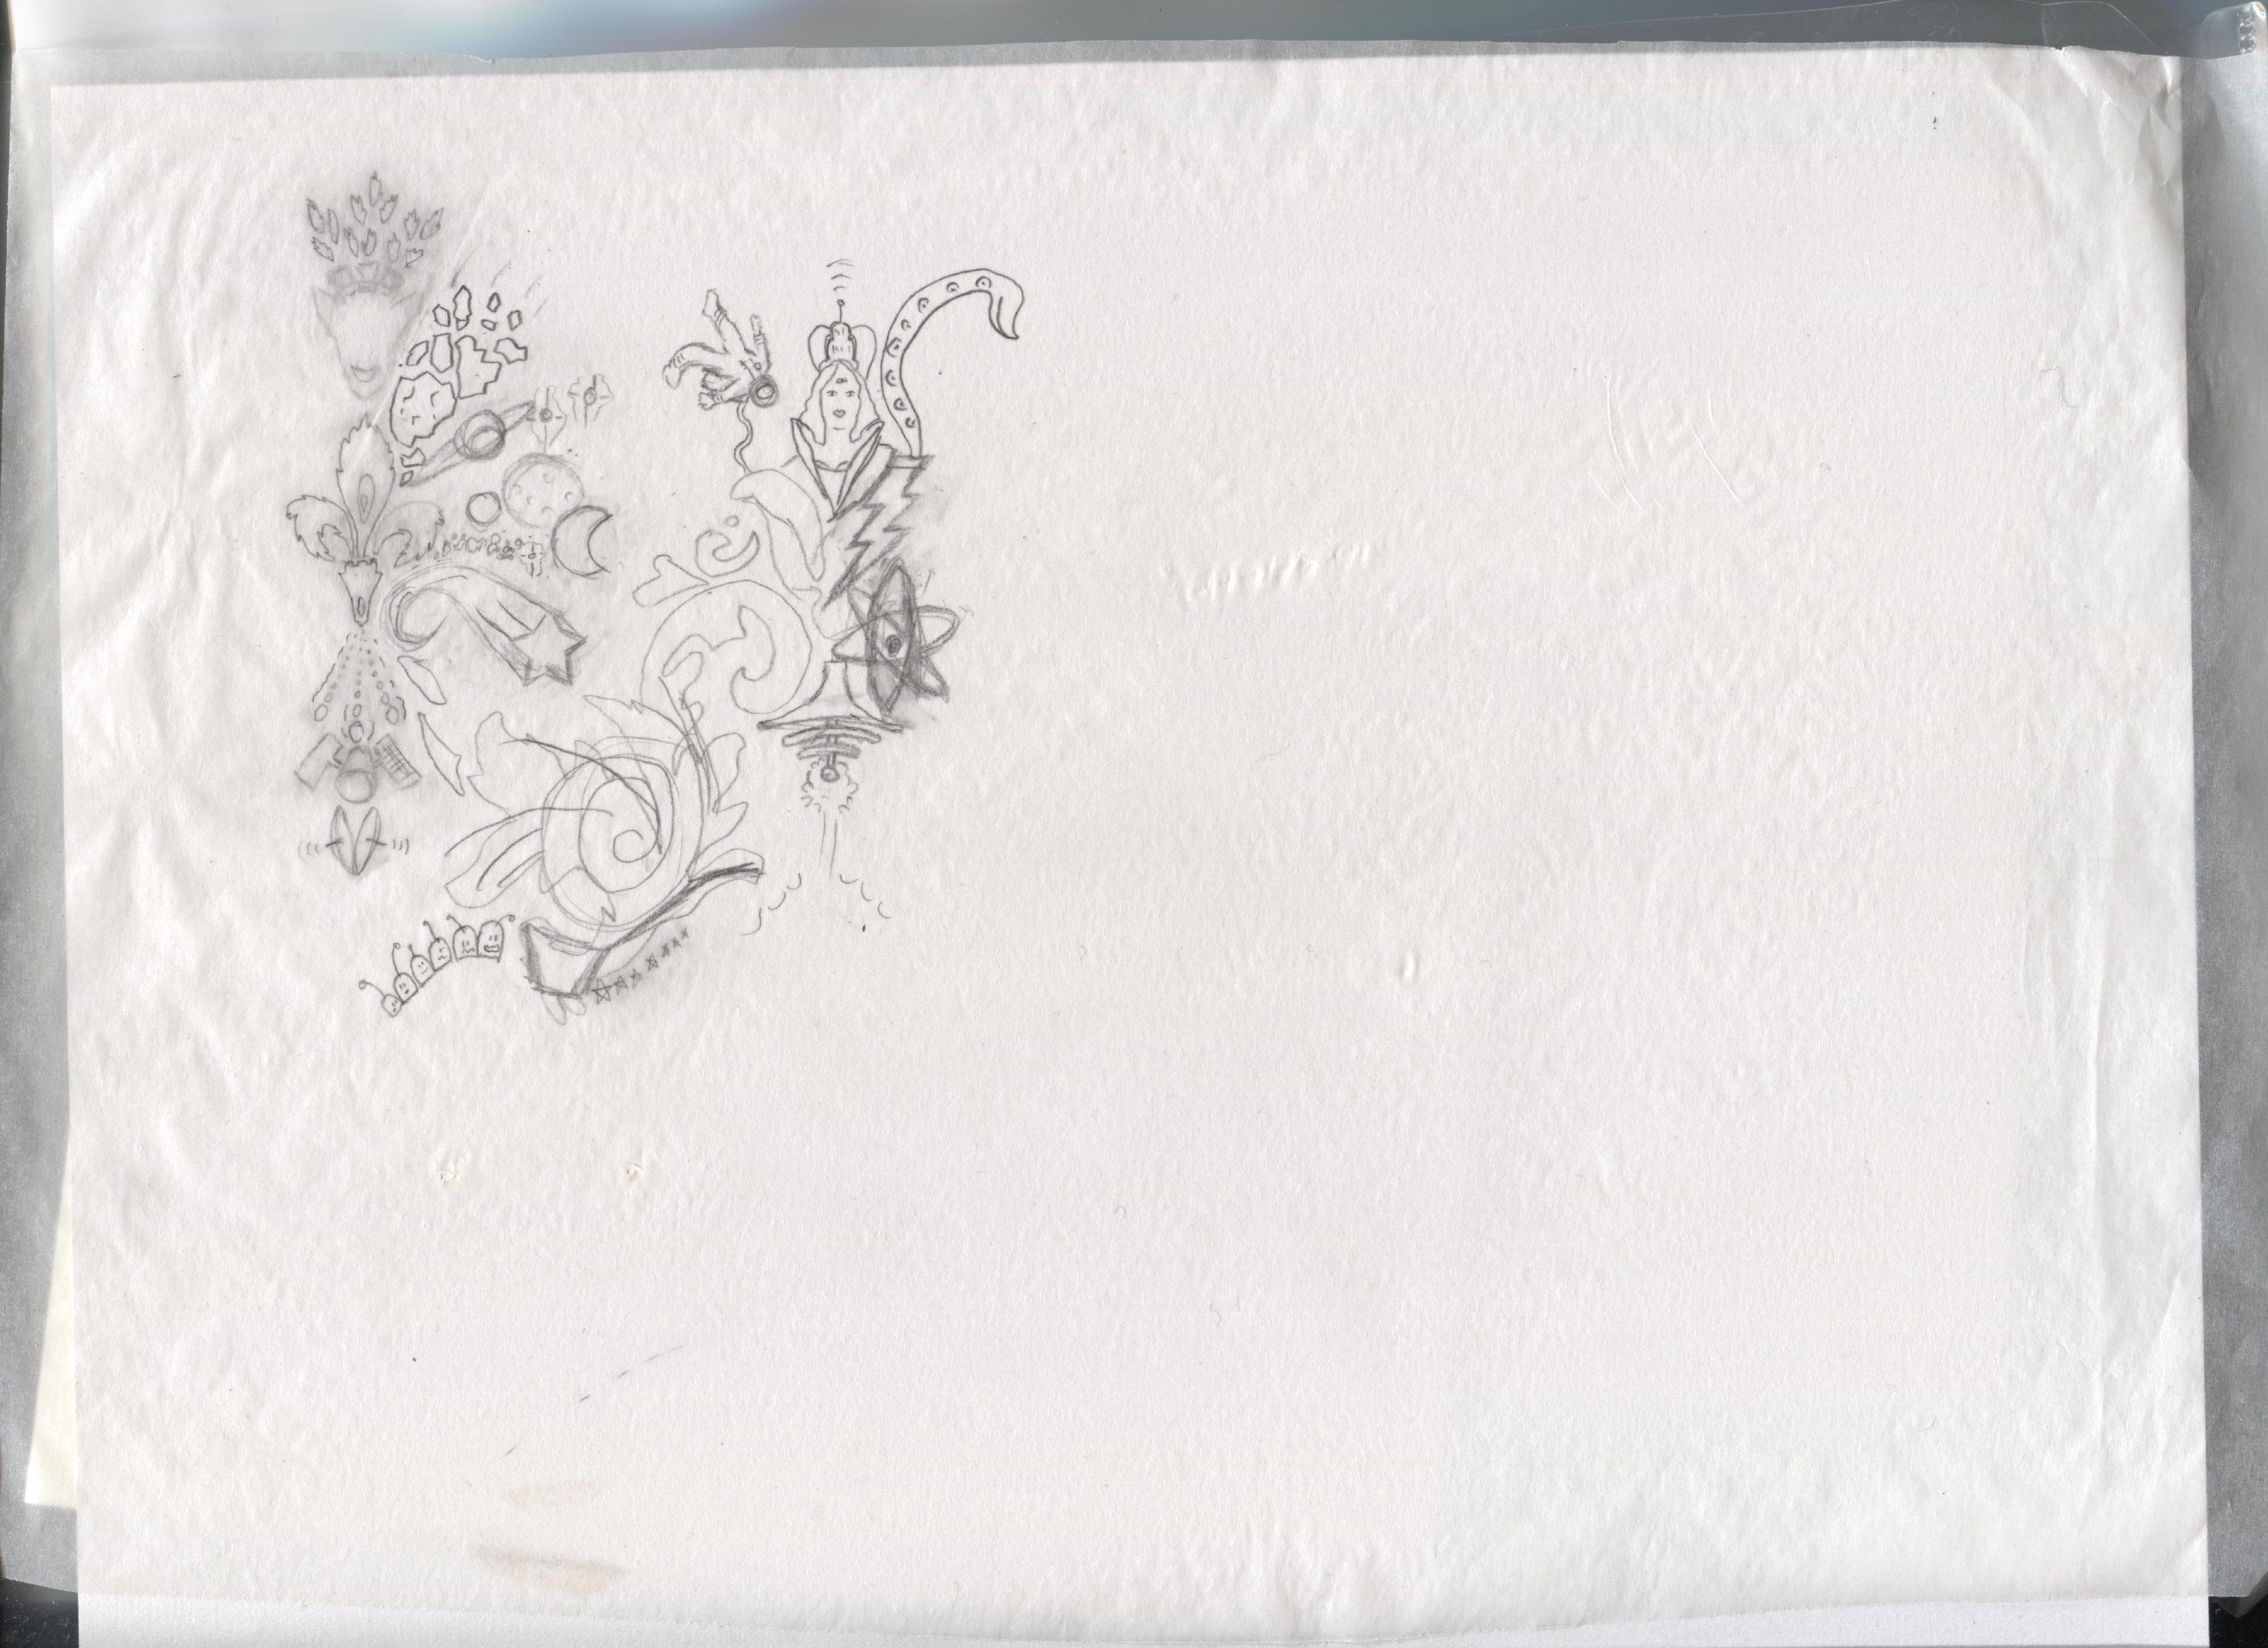
I grew a few gray hairs creating this Cosmic Damask fabric pattern, but it was way worth it! From pencil sketches, scanning, and then repeat process. You’ll need some tracing paper for this, unless you prefer using a drawing app with a digital stylus.
First, I scoured the web for a nice old damask pattern. Here’s what a quick search might turn up — almost any of these will do the trick:
Now print out the damask pattern you just found. Print on regular paper, in a size that is easy for tracing.
Lay the tracing paper over the damask printout. Now this is where your artistic vision and skill come in! Think of a theme and start filling in the damask area with your own doodles, like mine below:
You can scan the tracing paper and continue to work on it in your photo editor software.
Or, you can do a repeat pattern by hand on paper, old school style. (madamchino on Instagram)
The Hawai’i weather is awesome compared to New York City! There is no checking the forecast here — one simply leaves the house. It is a thing of beauty. And almost every day is a beach day, although for us ladies that can cut both ways!
So what do you get when you mashup Fifth Avenue or Rodeo Drive with a beautiful island beach? Seems you get Waikiki!
Waikiki Spam Jam 2016 (yes, THAT Spam®)
“Why would anyone want to perpetrate such a mashup?” is the logical follow-up question, and that is what I’ve often found myself asking since I arrived here a little over a month ago. Why did the developers think this commercialization of the beach was a good idea? Why is this area still dotted with construction cranes, when it seems so unsustainable? Is there no one planning long-term sustainable commercial/tourism development? Well, it makes digging for the hidden gems of real Waikiki character a bit tougher, but all the more enjoyable when discovered.
I guess this over-commercialization explains why some residents of the other islands are so fiercely protective of them. Stay tuned for my future forays to the islands…
That’s pretty much the gamut of responses I’ve gotten when I’ve told friends and colleagues that hubby’s job is spiriting me away to Hawai’i.
I’ve been reading about the aloha spirit, checking shipping quotes, furiously discarding unneeded items, and having last dinners, lunches, and coffees with all our friends and family.
Very excited to start a new chapter in life and hope you, dear reader, will stay for the journey.
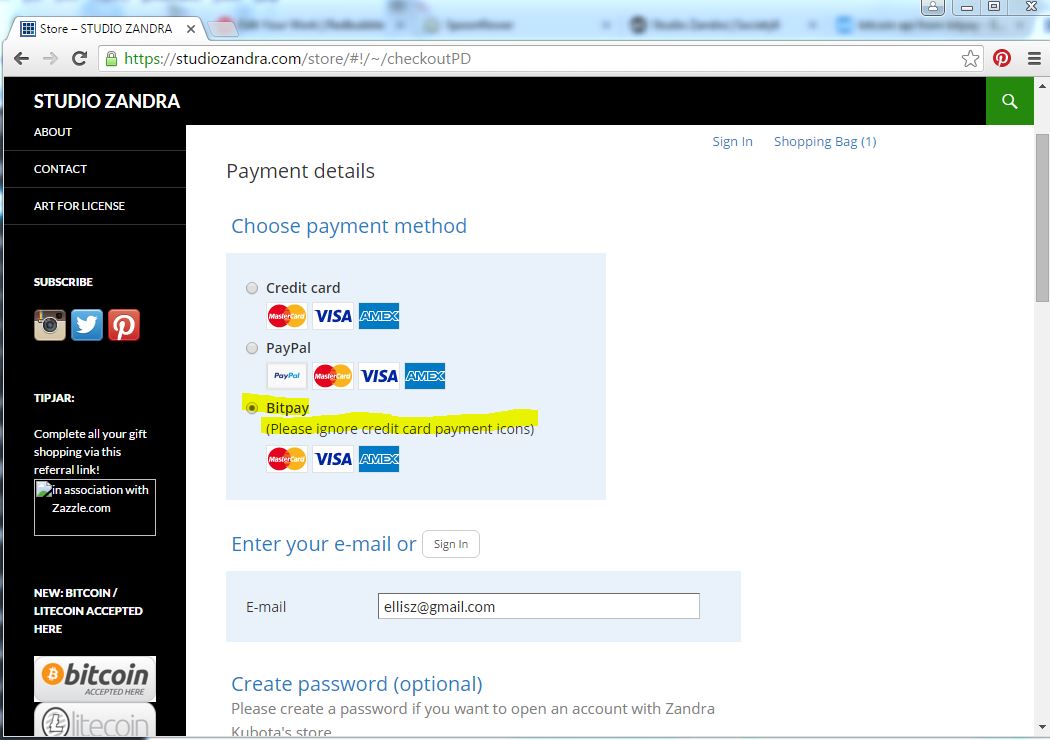
Instructions for the layperson installing the Bitpay Ecwid plugin
After trying unsuccessfully to install this Bitpay plugin at my WordPress site, I decided to go with a simpler plugin from GoURL.io . So while it is not the smooth solution I wanted and I now effectively have 2 stores, at least it is working and I can accept payments!
For anyone other artists out there who are not web programmers and want to accept Bitcoin using Bitpay on Ecwid, I can get you as far as getting the Bitpay option to appear on your Ecwid checkout page:
1. Backup your site, and make sure you have SSL enabled (you can purchase through your hosting service)
2. Download the zipped files for Ecwid Bitpay plugin from Github
3. Extract the compressed files and note the location
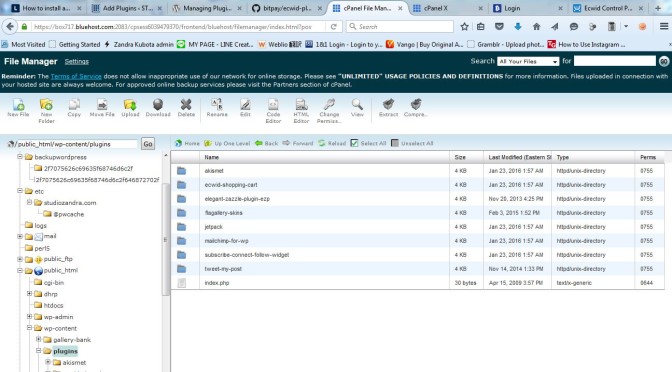
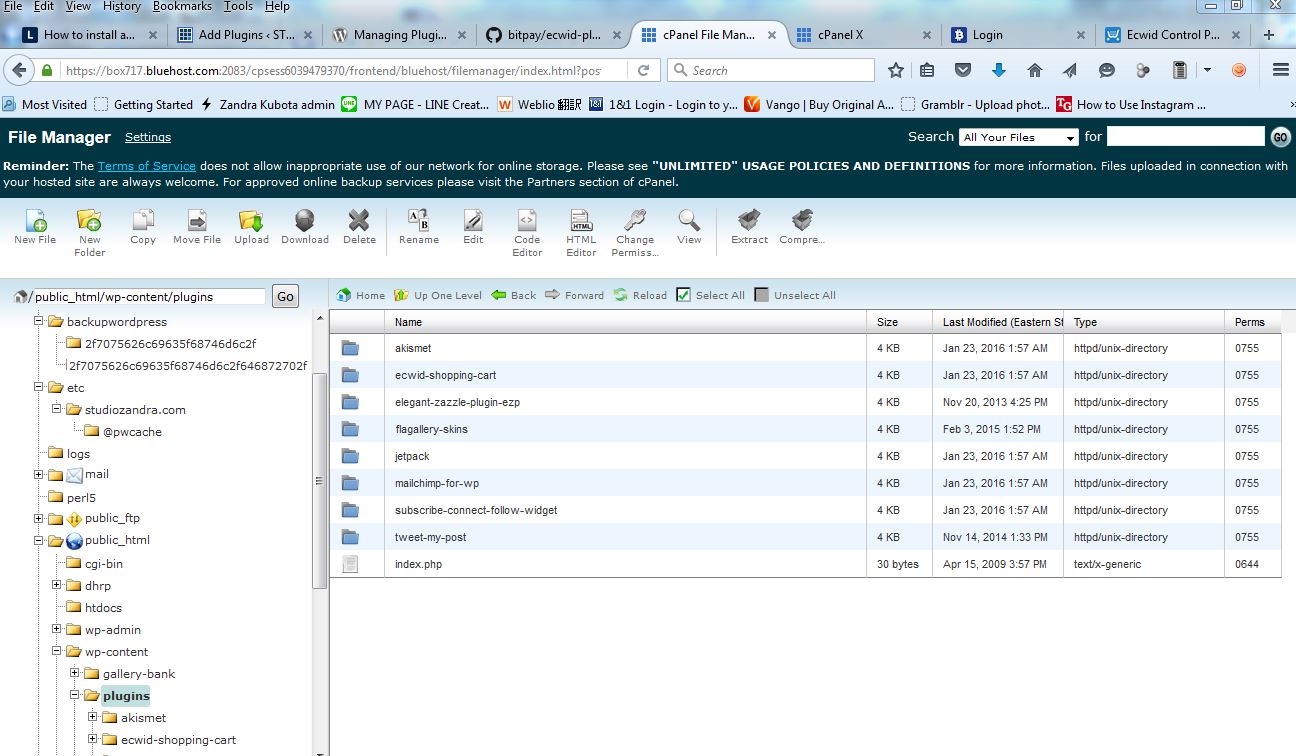
4. Log into your website’s hosting site and open the File Manager
5. Navigate to the folder in you site which contains your WordPress installation. Then open the sub-folder which has all your plugins, including Ecwid. It may be a location such as this: public_html/wp-content/plugins/ecwid-shopping-cart
6. Create a new folder there called “ecwid-plugin-master”
7. Upload the extracted files from Github into this new folder. (if you know how to FTP, you can also do that)
8. Open the “bitpay” folder, and then open “config.php” with your File Manager’s text editing feature.
Now you are ready to follow the instructions in the README file which was included in the files from Github to edit the config settings.
This is what you should see when you open the config.php file with a text editor. (I added my comments inside asterisks ***):
// ecwid settings
$storeURL = ”; // example: ‘http://www.example.com/ecwid/index.html’ ***fill in your store link between the single quotes***
$storeId = ”; // found in your ecwid control panel, bottom-right
// bitpay settings
// url of bitpay folder on your server. example: ‘http://www.example.com/ecwid/bitpay/
$bitpayURL = ”;
// apiKey: create this at bitpay.com in your account settings and paste it here
$apiKey = ”; // ex ‘DNboT9fVNpW7usAuDNboT9fVNpW7usAu’
// speed: Warning: on medium/low, customers will not see an order confirmation page.
$speed = ‘high’; // can be ‘high’, ‘medium’ or ‘low’. See bitpay API doc for more details.
//payment method settings
$login = ”; // see README ***generate a random string and paste here between the single quotes. You can use sites such as https://www.random.org/integers/***
$hashValue = ”; // see README ***generate a random string and paste here between the single quotes. You”ll need a third random string for the MDchecksum as well. Note these numbers in someplace where you can find it later, because you will need to enter them into Ecwid settings.***
// add trailing slash to url
$bitpayURL = preg_replace(‘#([^\/])$#’, ‘\1/’, $bitpayURL); ***This portion I don’t understand. I am still waiting to hear back from support@bitpay.com , if they ever get back to me, I’ll repost.***
The above steps got me this far…you can see the Bitpay option appears…but after clicking “Continue”, the next page generates an error.
Now for another one of those enjoyable digital tangents I go off on every now and then. I was asked to install Linux on a bunch of old HP 2140 netbooks to add a bit more life to them. Because it’s the distribution I’m most familiar with, I tried installing Ubuntu 14.04.3 LTS 32 bit, but it was still very glitchy, and I had problems installing the wireless drivers even though I had researched and downloaded them in advance. Next I tried Linux Mint 17.3 Rosa 32 bit, Mate version. (Thanks to some vigilant YouTube commenters, I found out that Mate is pronounced MAH-tay, as in yerba mate.)
I used a USB stick to install, since the HP netbook doesn’t have a CD drive. I made my own using a small application called YUMI from pendrivelinux.com . But you can also order a pre-installed USB stick from a company called OSDisc.com . Mint prefers you connect to the internet while installing, but this is not necessary — just install the Broadcom drivers after installing and restarting once.