|
(Adapted from the original English post at https://studiozandra.com/tech-tangent-python-on-linux-here-we-go/ )
子供の時に 本 いっぱい読んで 将来に学科になるつもりだった。 高校に入ると 美術 にしたけど、 まだ掌篇小説(しょうへんしょうせつ)や詩を書いていた。 いろんな興味がいっぱいありすぎて しまった!
テクノロジーについてを読むのが大好き。 最近 Python というプログラミング 言語 を学ぼうとしてる。 ブートキャンプのような地形は 高すぎて できないので オンラインをコースを受けている。Udemy.com で “Complete Python Bootcamp: Go from Zero to Hero in Python” と言うコース 9.99ドル 登録 することができた。
本気でやらないと思ってしまって Windows じゃなくて Linux でやろう とした。 それで一番最初の 段階で 困った。 このコースの中で ジュピター ノートブック(Jupyter Notebooks) という Web サービスを よく使うので、 インストールしないといけなかった。 アナコンダ というツール を使って、 ジュピターと Python 両方で インストールできて便利です。 そして Jupyter.org に行って ファイルをダウンロードして ダブルクリックした。 けどこういう赤い色のエラーが出てしまった。 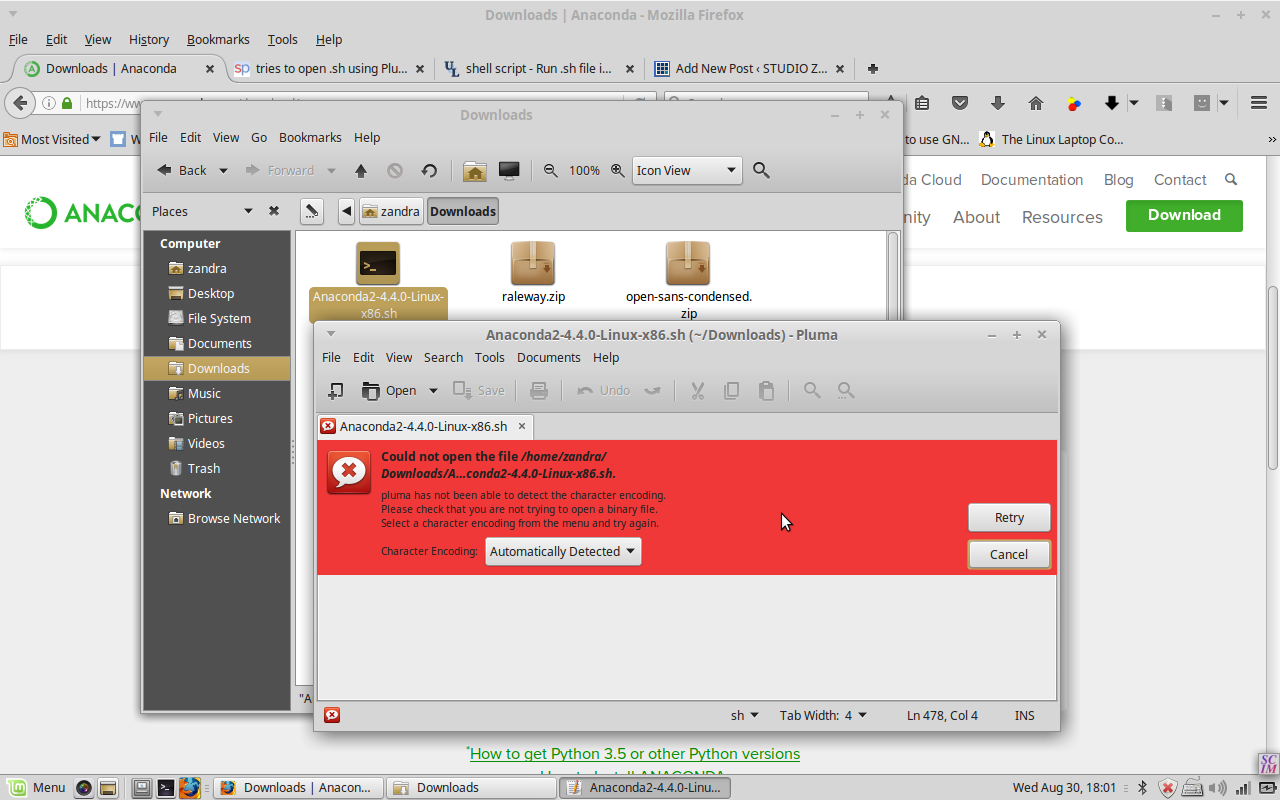 問題は Linux ちゃんは text editor でそのファイルを開こうとしてた。 ウェブ検索してから スタック エクスチェンジ stackexchange で正しい 仕方 を学んだ。 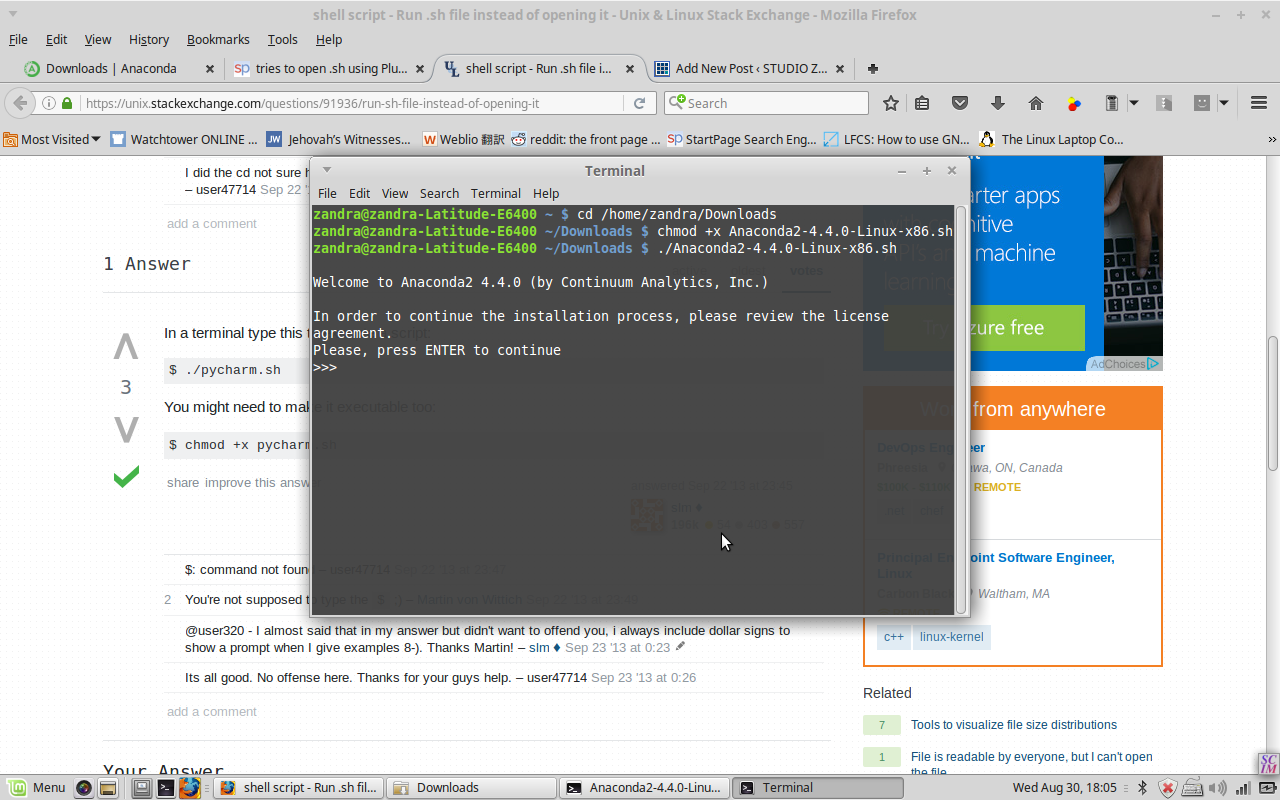 .sh ファイルを ターミナル(terminal)の中 そのダウンロードした ダイレクトリー に行って chmod のコマンド をしないといけない。 |
|||
Author: Zandra
もう一度日本語でブログ
ちょっと年取ったり違う国に住んだり 違う仕事を している状態になってるけど まだ 日本語 で遊んでいる。 今ハワイに住んでるので 日本語を使う経験 は すごい 増やした。 話すのはあまり問題ないけど帰ったり読んだりするのがまだ難しい
http://ejje.weblio.jp/
http://takoboto.jp/
https://www.facebook.com/pages/Takoboto/257922567700189
。。。を 使って これから 書きます!
PART 2: Symantec エンクリプション・デスクトップHDDをリカバーする
既に インストール ができた . 次は public キー と secret キー インポートする 。
セットアップ アシスタント というウィザード の 窓の 左側 を見たら、ユーザータイプ と言う 部分 がある 。
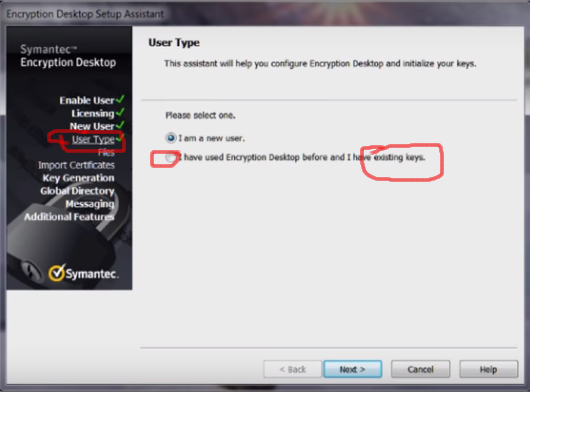
そこでニューユーザーじゃなくて、 existing keys を選んだ 。プロンプト の流れ で .pkr と .skr ファイルのフォルダー を選んだ。
そして彼女の古いハードドライブ を S ATA ケーブル で 繋いだから 「enter passphrase to access disk」っていうメッセージが出た。 私は視線をそらしながら 彼女がパスワードを入れてそのHDのホールダが段々出てきた!!
~fin~
English post at Symantec Connect Forums:
This community for the most part already knows that Symantec PGP Desktop was replaced by Symantec Encryption Desktop, but to someone encountering this software for the first time, this is not obvious. Clicking a Symantec Trialware link, the very next page is a registration form, and then a download for Symantec Endpoint Encryption TW. So as a layperson, I assume that the old PGP product name was changed to SEE, click “download,” and struggle to install the thing. After finally installing .NET, the dependent SEE Mgr and MSI, then the Client in serverless mode, I hit a brick wall. Going back to the forums it was dawning that NONE of the 3 packages I’d downloaded was the right one. Another commenter had posted the correct link and I finally downloaded the SED trialware but it wouldn’t execute, and so I posted the previous questions.
Meantime I started looking into other workarounds, wondering, “Is Symantec PGP Desktop proprietary encryption? Or, as long as I have the keys and passphrase, can I use any software on any platform to decrypt?” I read the Wikipedia entry on PGP and confirmed I’d gotten the software names confused (easy to do!)
I did another Google search regarding the SED installer which would not open: I think the registry might have been corrupted by the brute uninstall of the SEE Client, so I tried 64-bit on a different laptop and it opened and installed fine!
Then there was the problem of the license key…
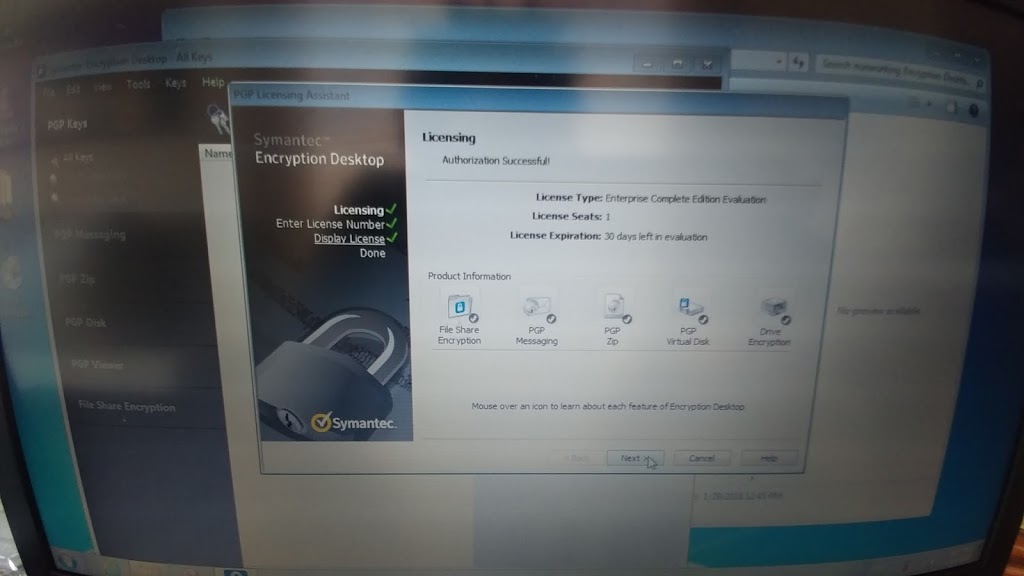
At first, like these commentors, I thought there was no way to activate using the product key I received in my trial email.
The “thank you for trying SEE (confusing wrong product name again)” email sends a temporary product key that is too long to fit in the allotted spaces. A video instructionn said to paste the whole thing, but I was on a separate machine from my email, so I just typed. But it worked — just cut the key in half and copy the latter half of digits only. (They email you a 12-segmented license key, but only use the last 6 segments.)
Then there was the problem of the license key…
At first, like these commentors, I thought there was no way to activate using the product key I received in my trial email.
The “thank you for trying SEE (confusing wrong product name again)” email sends a temporary product key that is too long to fit in the allotted spaces. A video instructionn said to paste the whole thing, but I was on a separate machine from my email, so I just typed. But it worked — just cut the key in half and copy the latter half of digits only. (They email you a 12-segmented license key, but only use the last 6 segments.)
After installing and licensing, in the User Type section don’t select New User. Rather, select Existing Key option. Then follow the prompts to browse to the directory containing your original .pkr and .skr files. We plugged in the old HD with a SATA USB cable and a pop-up appeared “Enter passphrase”. So we were able to recover all her data.
(In case anyone else comes across this same situation — that is, having keys and passphrase but cannot get an old copy of PGP Desktop or a working trial copy of SED — try looking into other software, such as GPG Suite (Mac) or GNU Privacy Guard (GnuPG, Linux) for recovery. See this discussion: https://gpgtools.tenderapp.com/discussions/problems/964-migrating-from-pgp-to-gpg-import-private-key
and this https://www.dewinter.com/gnupg_howto/english/GPGMiniHowto.html#toc3.3 (Import key, no graphical interface though)
Maybe even try to import the key into the old PGP Desktop for Windows? **I cannot vouch for this site bc I haven’t tried it!** https://pgp.en.softonic.com/?ex=DSK-347.2
Perhaps someone more knowledgeable could comment on this ‘decrypt by importing keys into other software’ option.)
PART 1: Symantec エンクリプション・デスクトップHDDをリカバーする
すごい 大変な経験あったけど、すごい勉強になりました 。
エンクリプションについて いっぱい学んだので ここに述べたいと思います。 シマンテック のエンクリプション・デスクトップ(Symantec Encryption Desktop) の件です。 友達のノートパソコンが動かなくなって 修理しようと しました。
彼女の主人が 何か変なポップアップをクリックしてしまって ラップトップが おかしくなりました*
*彼女のラップトップたんですけど仕事のためにお客さんのデータを守るためにエンクリプションしないといけないって言われて しょうがなかった。
でもこれは7年前 の買った古いラップトップ だったので インストールしてくれた人はもう 連絡できずに 私と 私の主人に 頼んで いることになった。
一つ のバックアップを持ってた。 そのバックアップは 1年前で 古かったけど、 PGP の パブリックキーと シークレットキー(.pkr/.skr file)は 入ってた (PGP というフォルダの中に入ってた)。
「 じゃあ、 ラップトップから古い SDD を外して 新しい Windows 7の インストール して そして もう一度 Symantec
エンクリプション・デスクトップを 新しくインストールして から そのkeyを インポートすることができるでしょう」 と思ってしまいました。
彼女はそのインストール CD もう持ってませんでした それで ダウンロードしよう して symantec.com に調べに行った 。サポートリンク で pgp Desktop の無料 トライアル バージョン をクリックして。。。
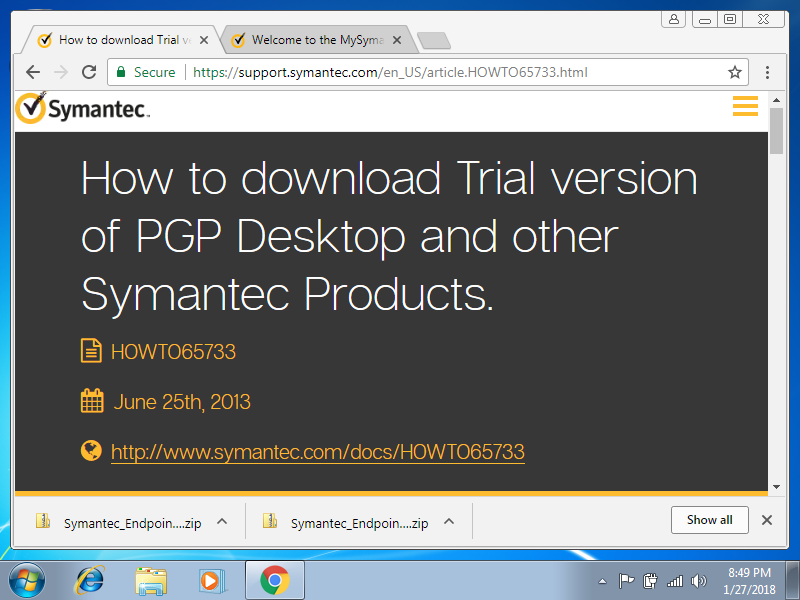
。。。ダウンロードページ に行かれて から「あれ 、これって PGP デスクトップじゃない !」
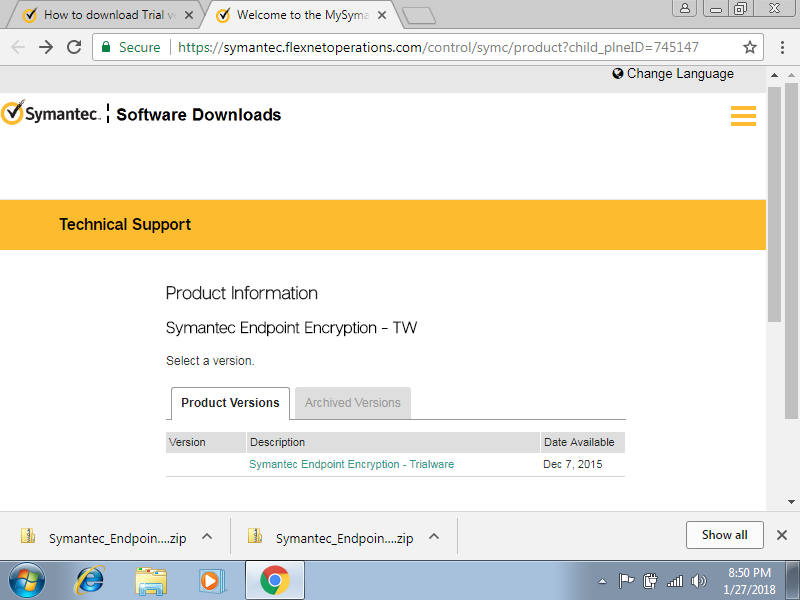
シマンテック・エンドポイント・エンクリプション ( Symantec
Endpoint Encryption) しかなかったので、それをダウンロードした。
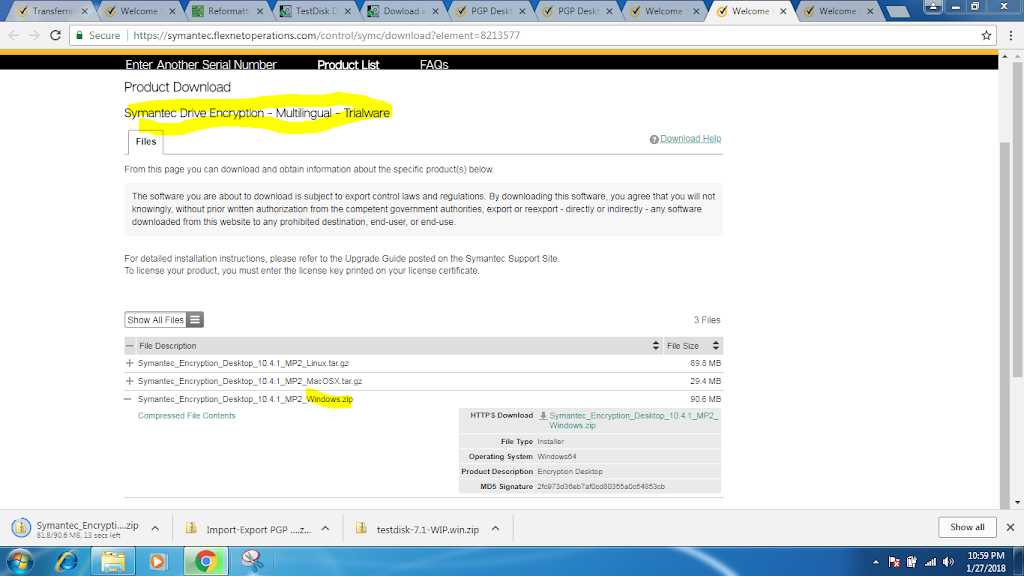
数時間後 全然違うソフトをインストールしてしまって いたことを 気づいた。 シマンテック・エンドポイント・エンクリプション (Symantec
endpoint encryption) ではなくて、PGP Desktop の名前が 変わって Symantec Encryption
Desktop という名前になっています。
ダウンロードした後に「 thank you for trying Symantec Endpoint Encryption 」(違う 名前)のメールが来た。
そのメールの中 ライセンスキー は入っいる けど長すぎて 入れる場所をないと思った 。

しかし半分だけのコードを使ったら うまくいけた。 後半 の部分 だけ入れて、 30日間の フリー トライアルが残ってます というメッセージがあった。
続く。。。
My English post from Symantec Connect forums:
Attempting to reinstall Symantec PGP Desktop for a friend whose laptop quit booting properly after her husband “clicked ‘OK’ on a strange-looking” dialog pop-up. Toshiba Satellite A665, pretty old machine but still meeting her needs just fine. She’s an independent contractor who was required to have encryption installed on her personal laptop, but the original consultant/vendor who did the install is long out of business.
She has a folder marked “PGP” containing 2 files ending in .pkr and .skr which I think are the keys, and she still remembers and uses her password daily so that’s not a problem. So I thought I could try to find the trial version/old version of PGP Desktop installer, download, and install to a fresh drive in the same laptop, and import this key, slaving the old SSD with a cable.
Wrong! Hours later and I’ve only just realized that I probably have the wrong software (did PGP Desktop product name change to Symantec Endpoint Encryption, or is it now called Encryption Desktop??? If so, how do I download it?), not to mention I don’t know which version except that it’s from 2011.
So I just uninstalled both SEE Management Agent and SEE Client (…I think! I got this error: “Error Disk is still encrypted. Uinstallation aborted.” https://www.symantec.com/connect/forums/see-management-agent-failure?ts=1517136170 but I THINK I fixed that by using Revo Uninstaller because SEE Client is finally gone from the Uninstall Programs list). I am back to square one.
1. Should I be using Encryption Desktop and if so where can I find a copy? I thought I found it here, but after extracting I click on it it and nothing appears (Task Mgr says it’s running, though!): https://symantecesd.flexnetoperations.com/208927/9…
2. After I get Encryption Desktop installed, how to import the .pkr and .skr files? Or will the original password be sufficient?
To be continued…

Tech tangent: Python on Linux — here we go!
Not even sure I should call this one a tangent, since I’ve been doing a lot more tech reading than drawing and designing lately. I thought I could turn my art into a side gig, eventually growing into a licensing income stream, but that hasn’t been working out. So maybe my other hobby, techie reading, will play out eventually…
With such an interest in tech in general, I decided to try learning Python again (I learned a few basic operations a few years back but not much beyond “hello world”.) Let’s see how long it will hold my interest this time!
Udemy had a $9.99 sale this week, so I bought the course “Complete Python Boot Camp: Go From Zero to Hero in Python”.
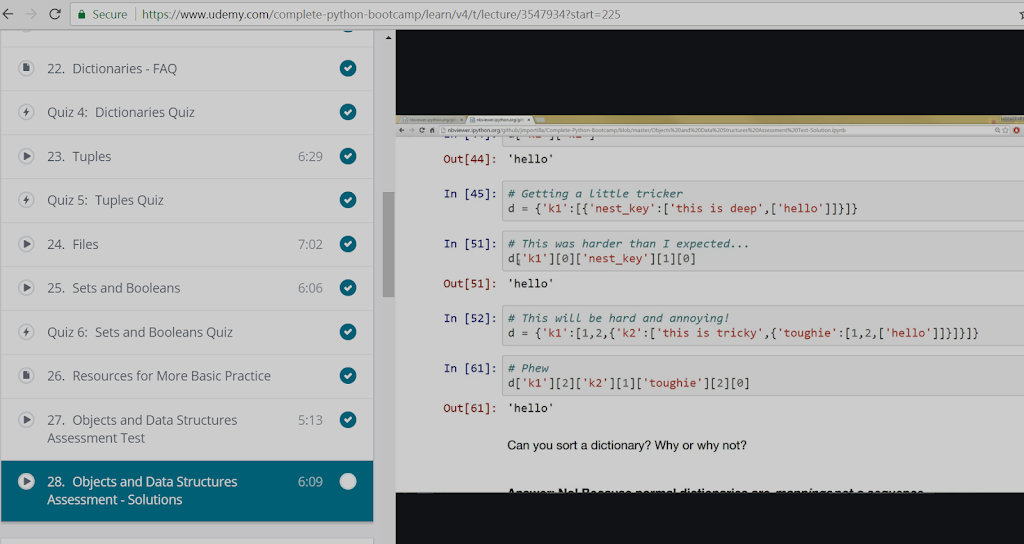
I decided, as I am wont to do, to go all in: try to complete the course on Linux instead of Windows. Getting stuck at jump, (“Course materials installation guide,”) prompted this blog post! The course uses Jupyter notebooks, and they recommend that newbies use something called Anaconda to install both Python and Jupyter. So I had to visit Jupyter.org on my laptop. After downloading the file Anaconda2-4.4.0-Linux-x86.sh , I of course tried to double-click it, and got this:
The text editor is tryna open it! So a web search brought me to StackExchange, where I learned that you have to manually run the .sh file from inside the correct directory in Terminal. Success!
So I entered ‘jupyter notebook’ into a new terminal window, it was very anticlimactic to just see a new browser tab opened with …a list of my local folders. But glad it’s finally done!!
It’s pretty easy to write commands in Python and then immediately run them by pressing Shift-Enter. And saving is easy as well. On to the next course module, I hope it doesn’t take as long as the installation took!
Yes, I’m sewing!
So “vents” are apparently slits. By process of elimination and also by process of tearing out my hair for hours, I’ve deciphered my first garment pattern.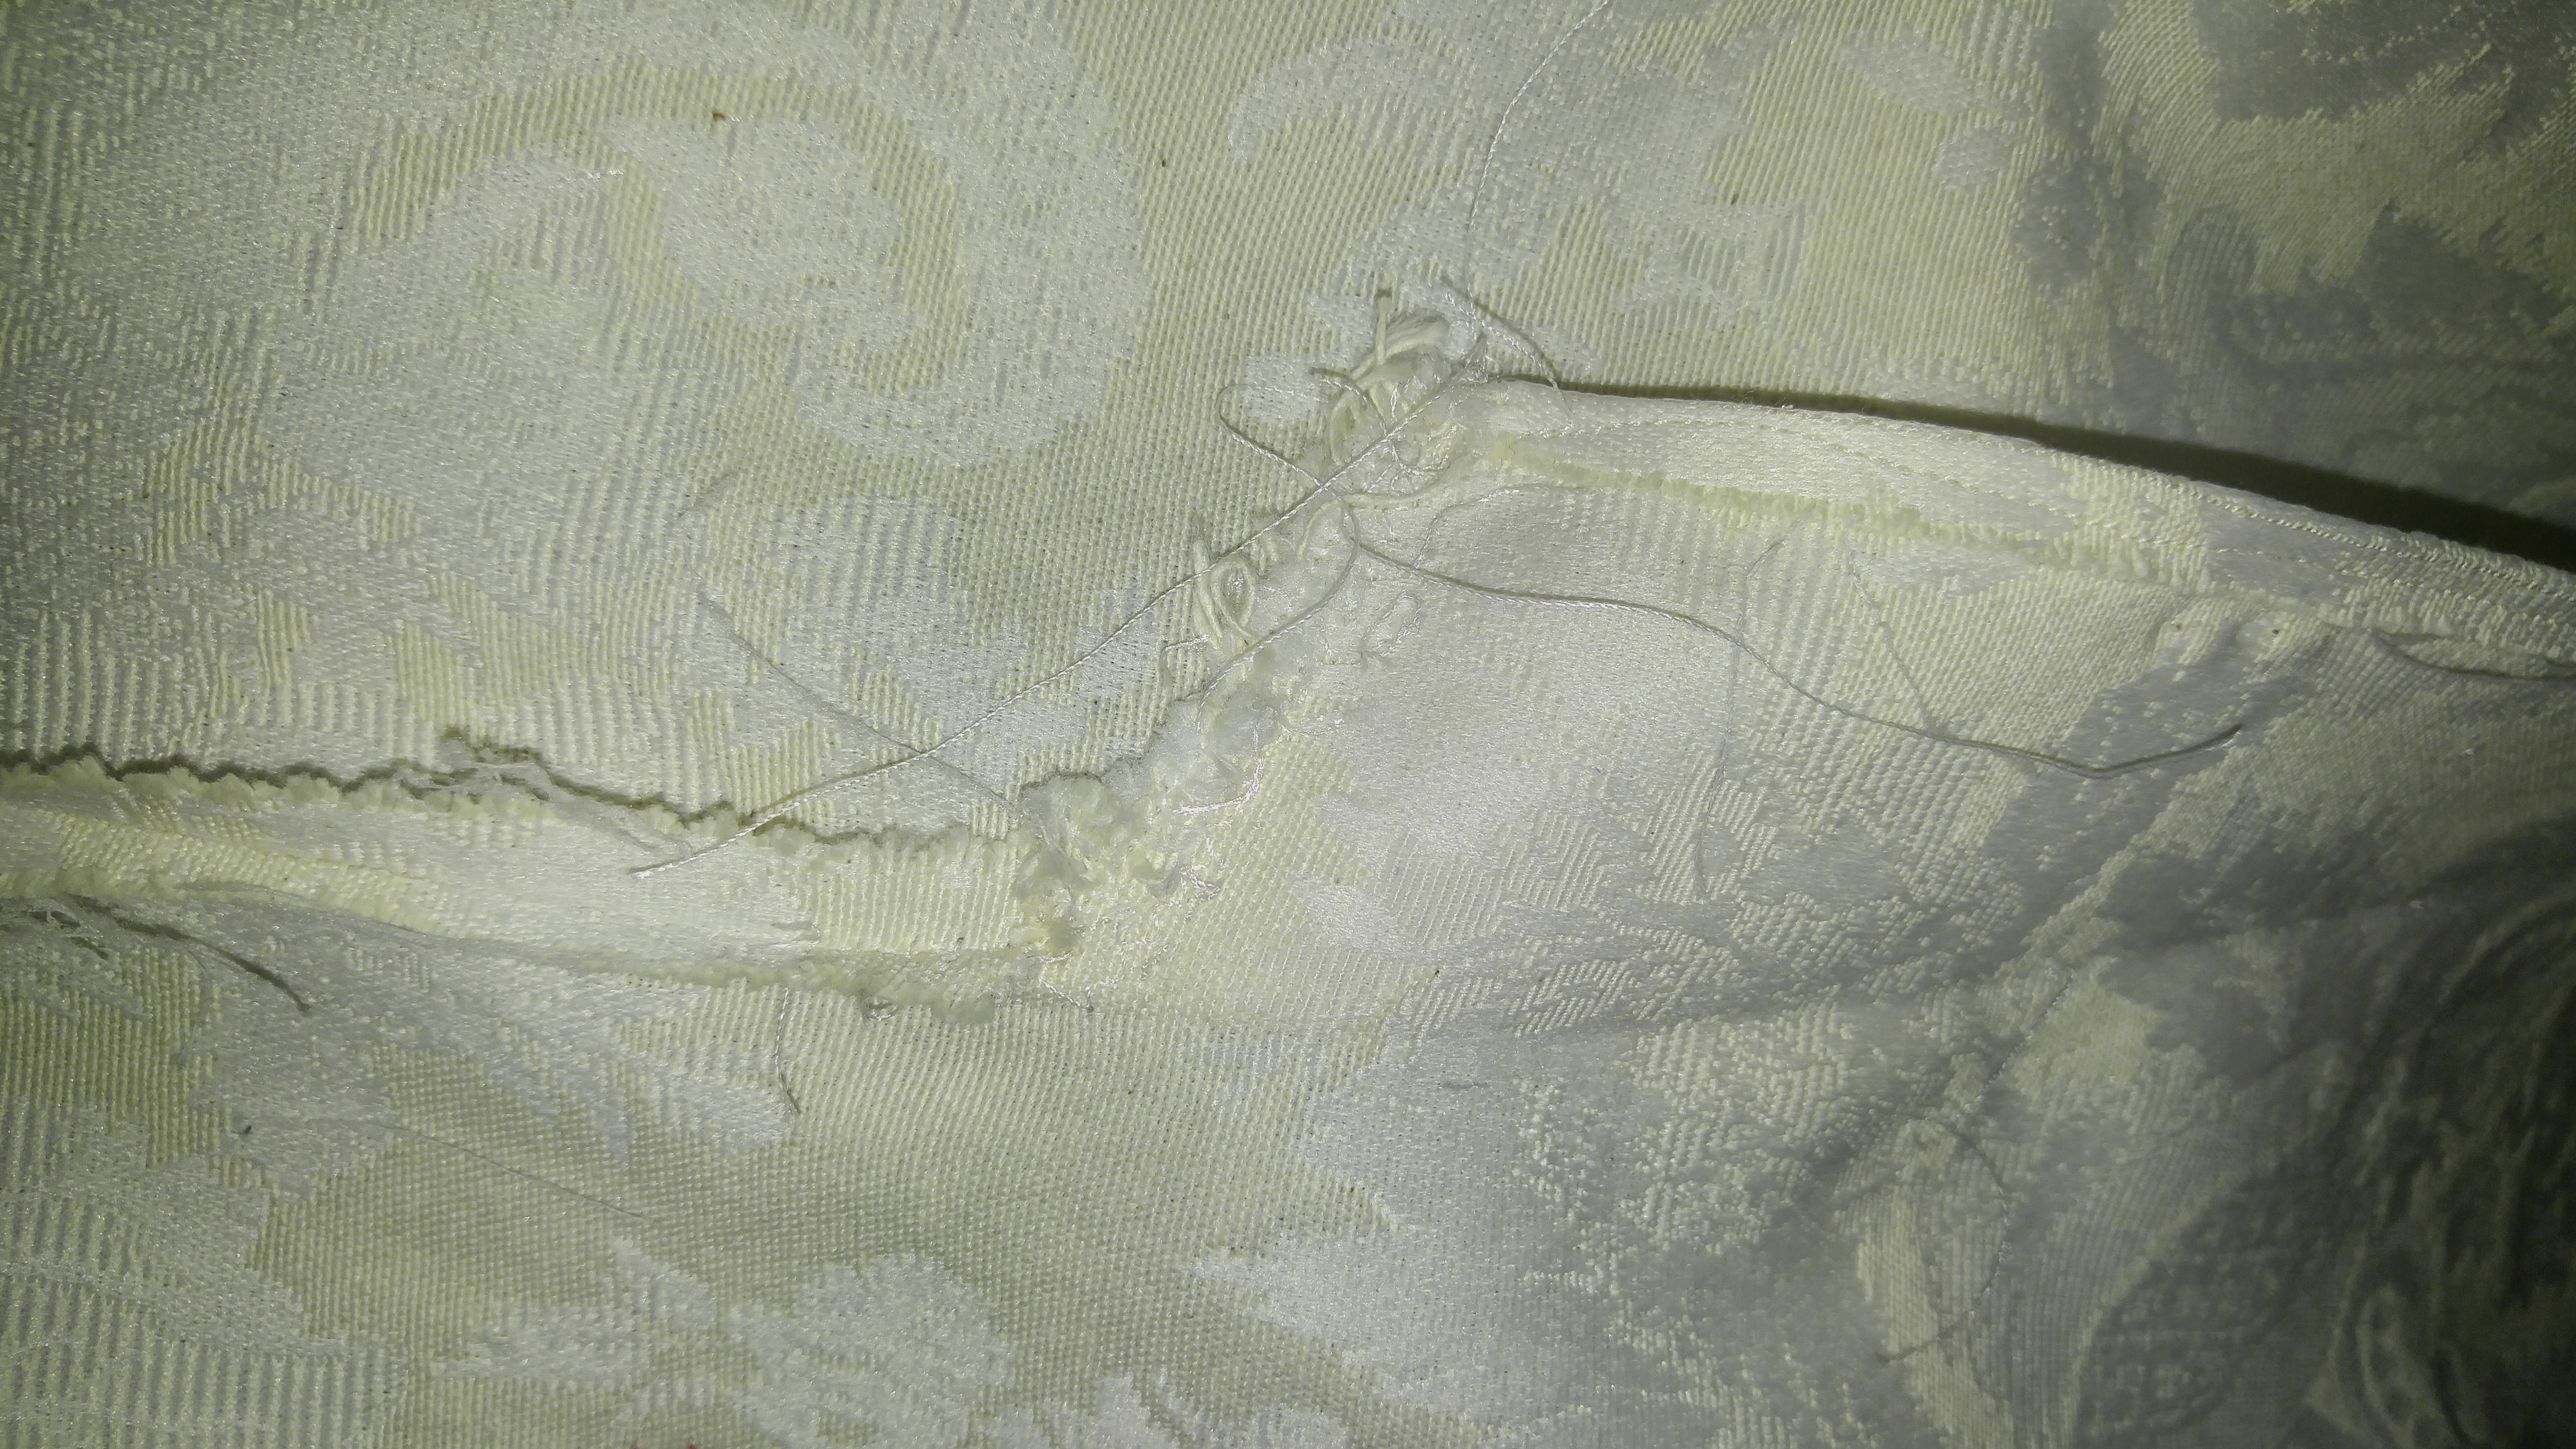
Special thanks to YouTube and the rest of the interwebs for helping me unlock the jargon of “Simplicity” New Look 6312.

Ok, I admit, I chose the wrong pattern for my first project, what a newbie, indeed! But it came out not too shabbily!
Next I made not one, but TWO little zipper pouches. Again, YouTube gets my gratitude and praise: The Crafty Gemini has some great tutorials.

My first zippered pouch, made using my own fabric design as well (Koi Pond)
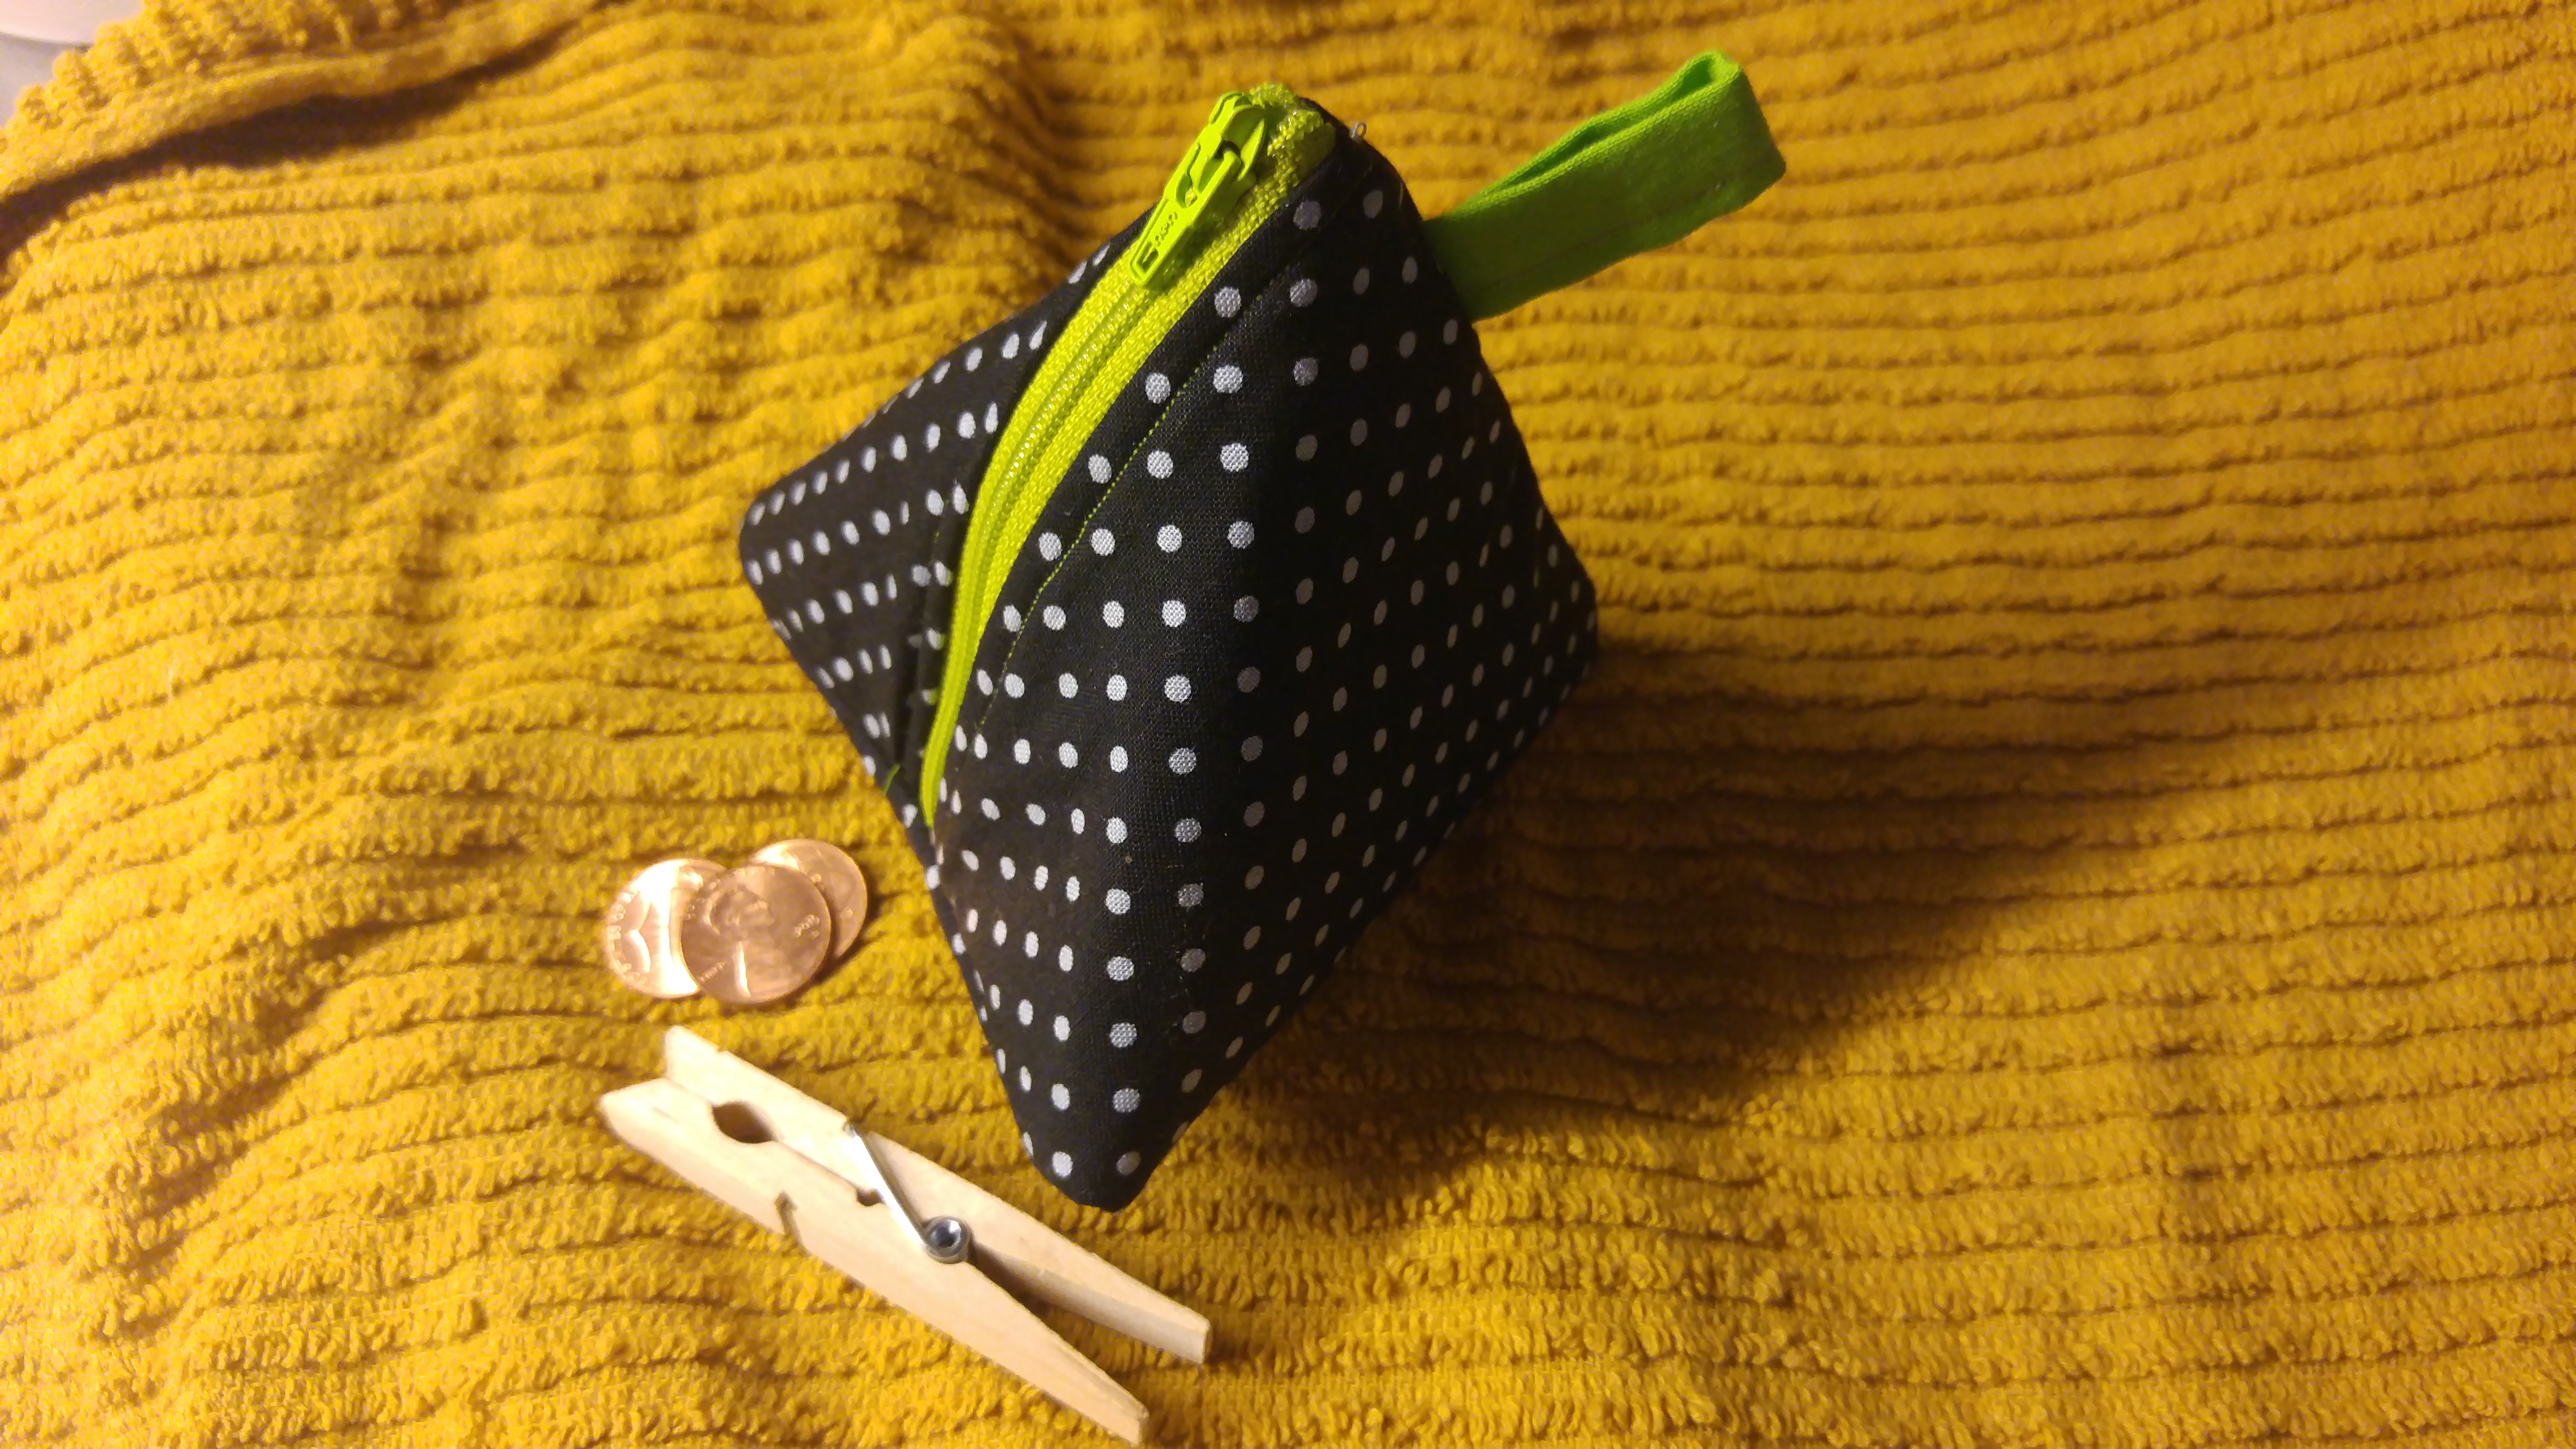
Second pouch, made with fusible this time instead of quilting
What to make next? I have a few precious swatches of my own Spoonflower designs, but they are on the smallish side. The tutorial hunt begins anew!

Taniku shokubutsu
Taniku shokubutsu, or “spoiled child”, according to Weblio‘s definition of the word “succulents” in Japanese:
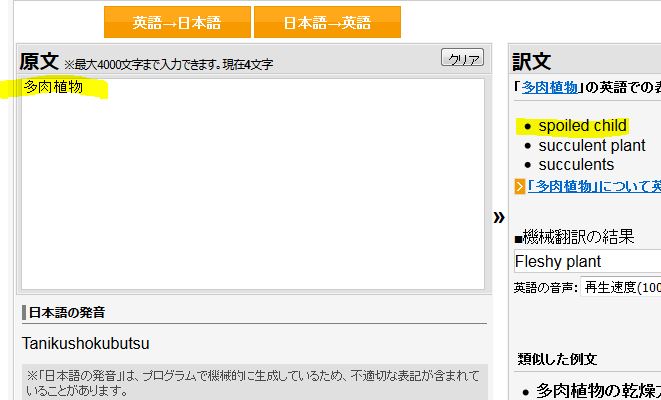
I guess a spoiled child would probably be ta-niku (have plenty of meat)!
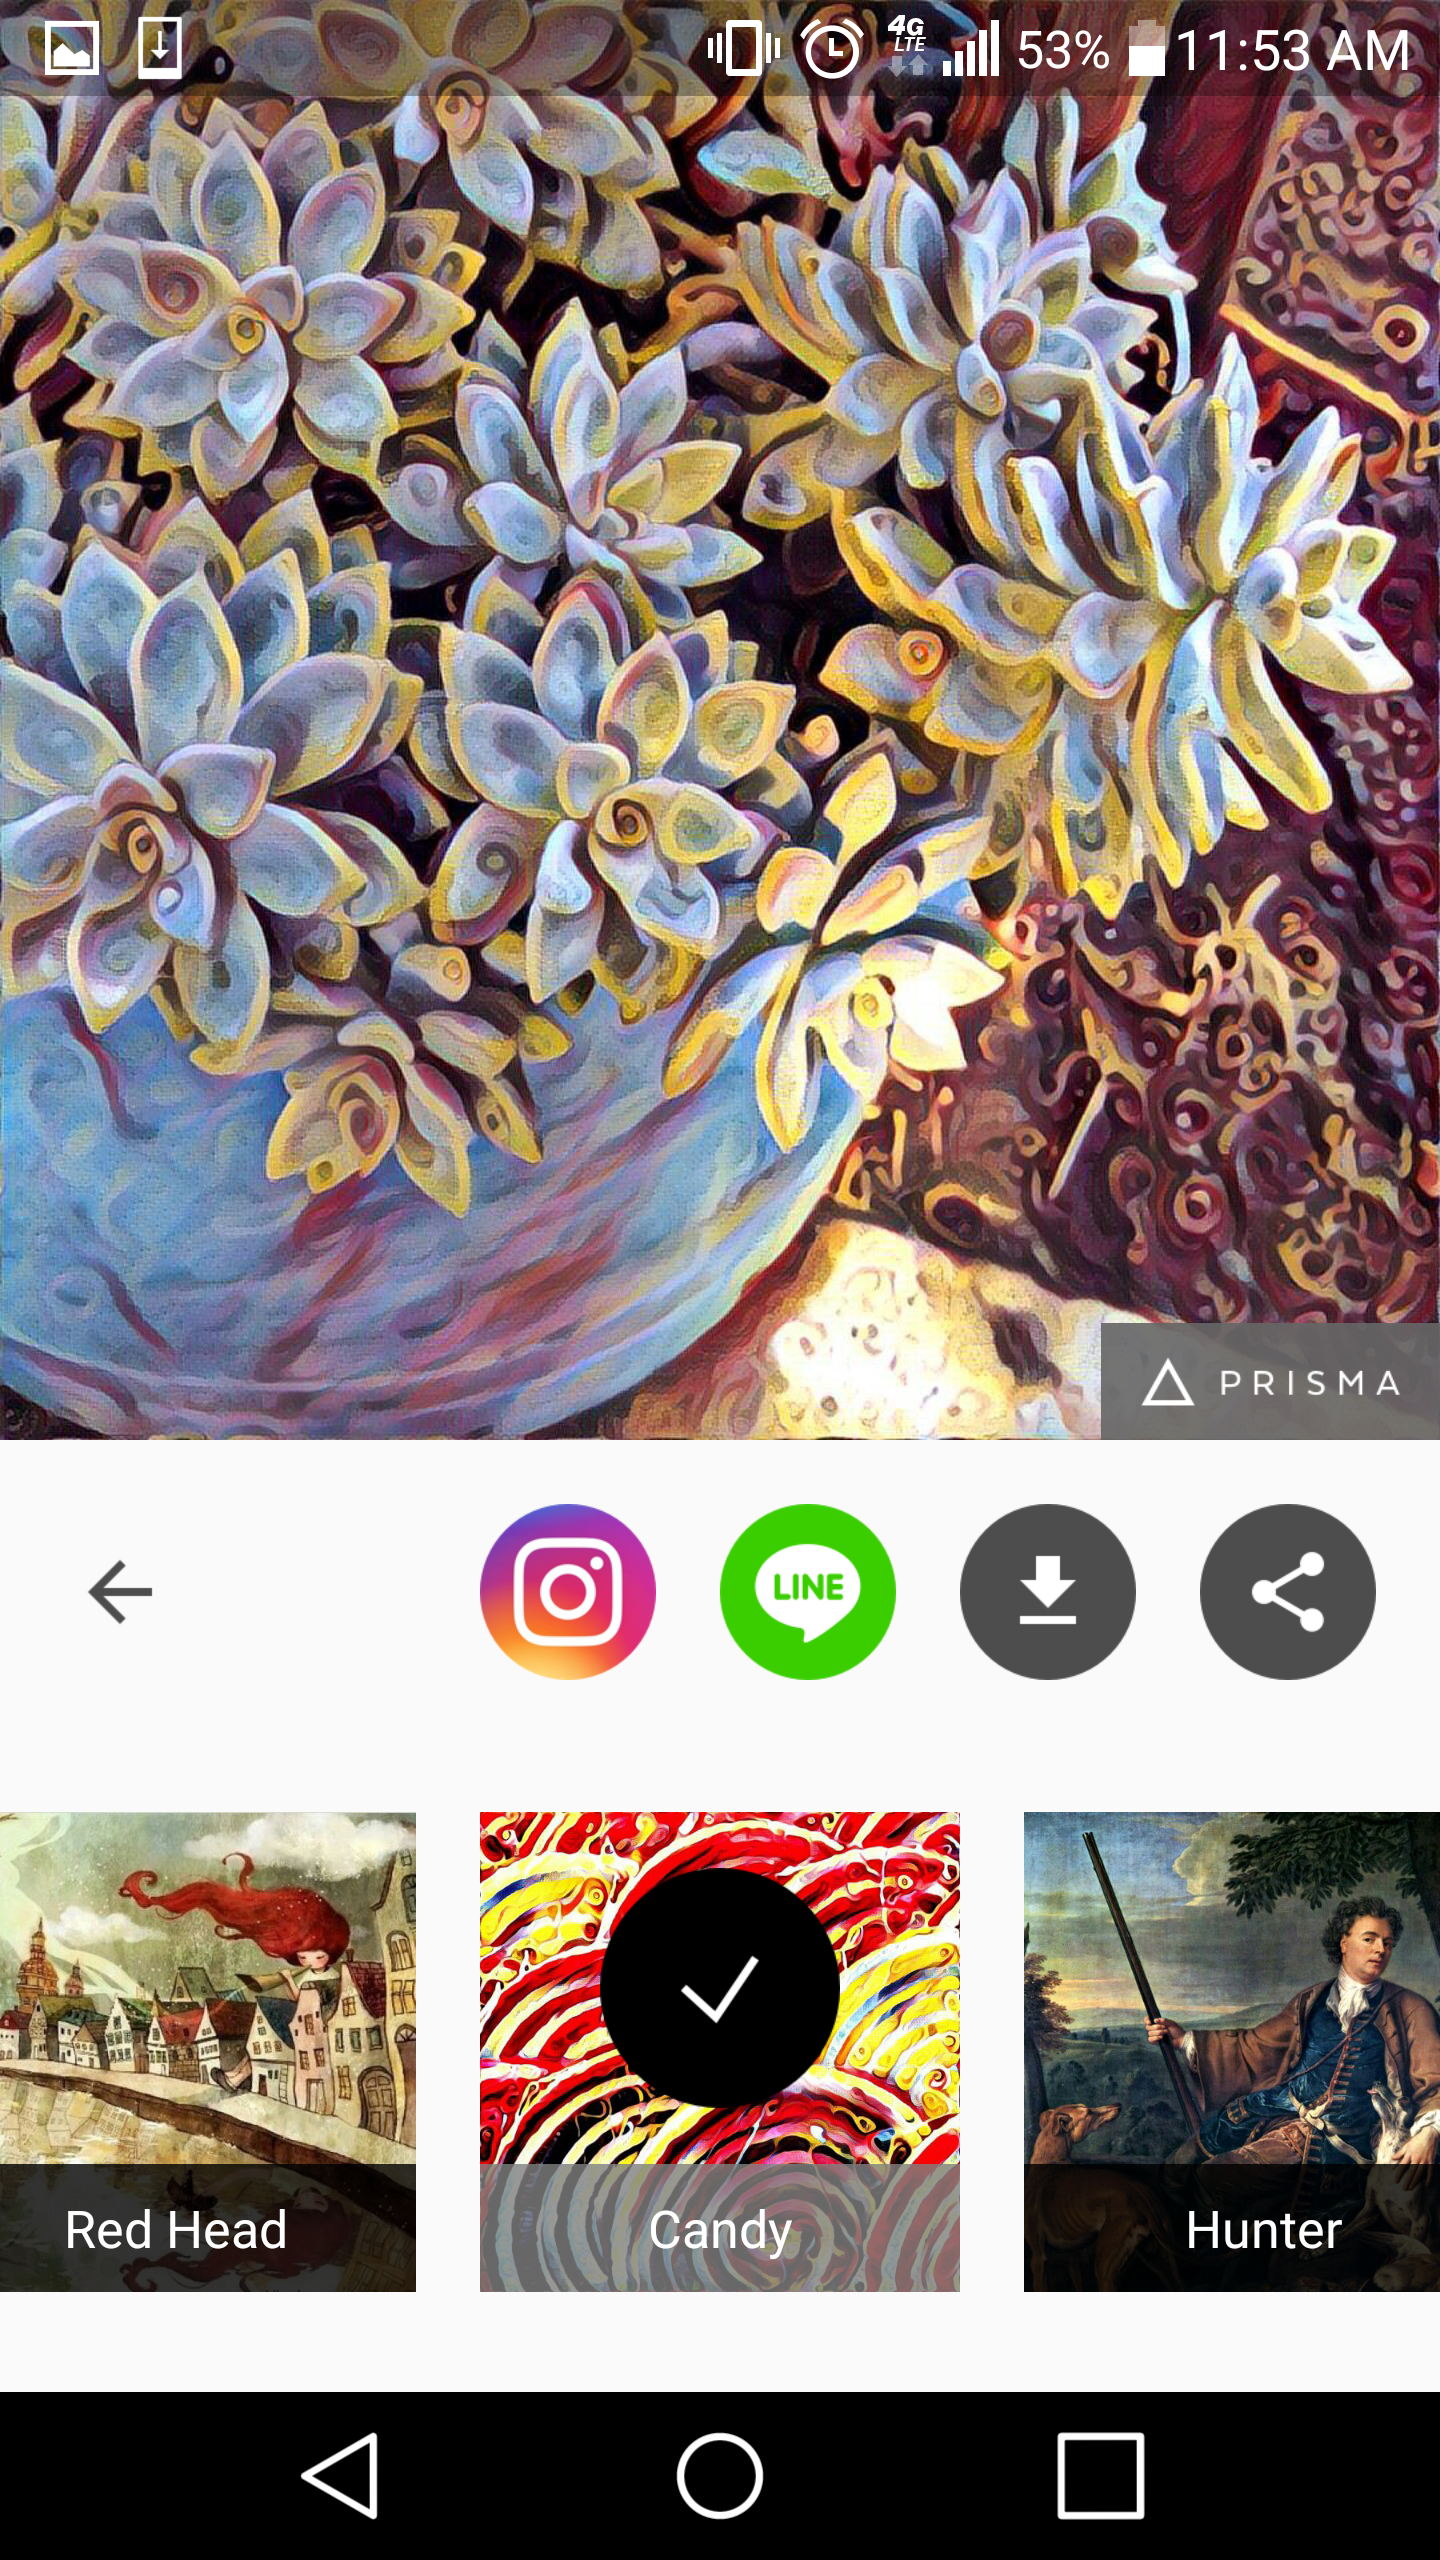
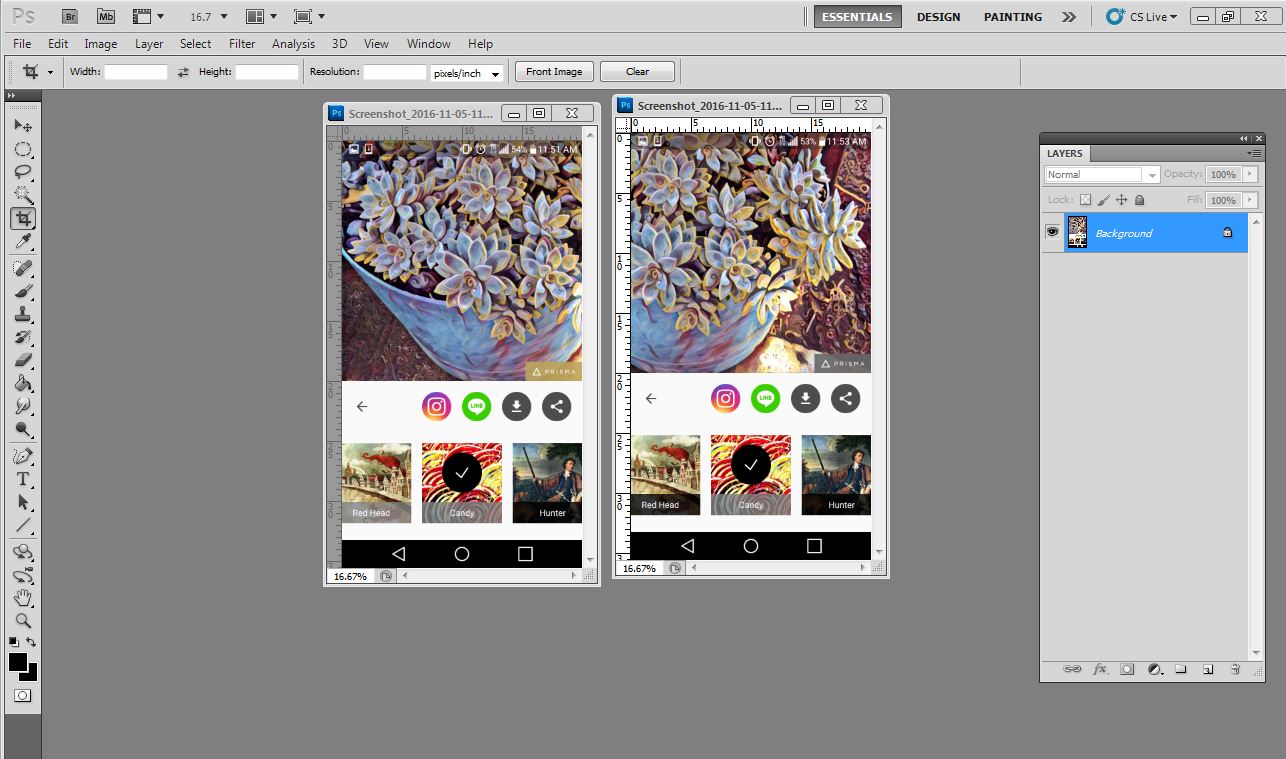
I had absolutely no IDEA about the succulent-verse online until I photographed the adorable little things as I was walking one day. Peeps are real serious about these plump plants! Using the PRISMA app, I made a colorful fabric pattern out of some little succies I photographed while walking near Date Street in Honolulu, HI.

Then using the Prisma app on my phone, I applied different filters to the photo:
Then I took a screenshot of my phone and opened it in Photoshop (CS5, version 12.0). You can also save the photo or e-mail it to yourself. (Prisma cropped my photo so I had to run it twice, once on each side of the photo.)
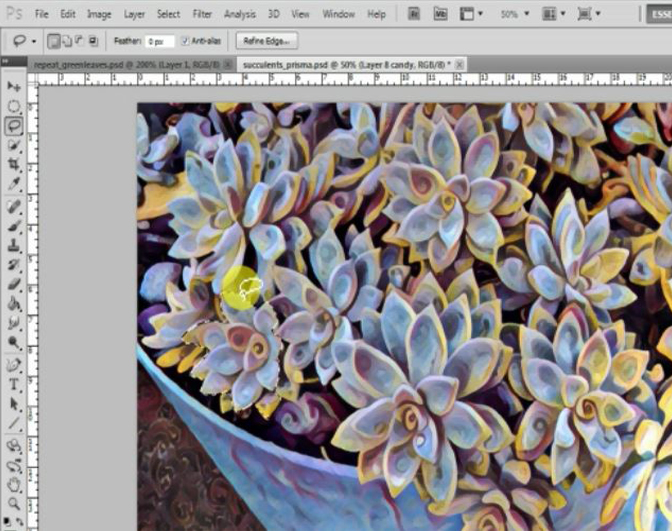
After cropping out the phone stuff and the app, I aligned and joined the 2 halves of the photo together into 1 layer. Then I made a backup, duplicate of the entire layer and turned it off, just in case I messed up later.
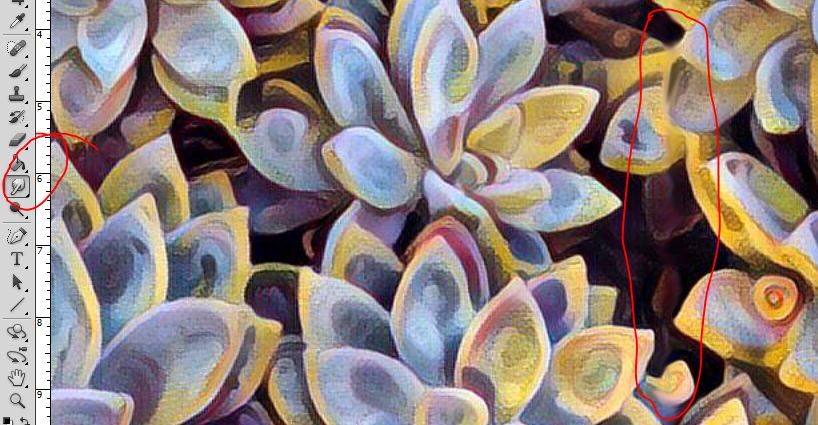
Next I used the Lasso tool to duplicate a few flowers. I just traced around the edges of a flower and Copied as New Layer a few times, until I had a few extra flowers to be used later as ‘filler’.
Then I used the Offset filter (select menu Filter>Other>Offset) to turn the picture into a repeat with four corners.
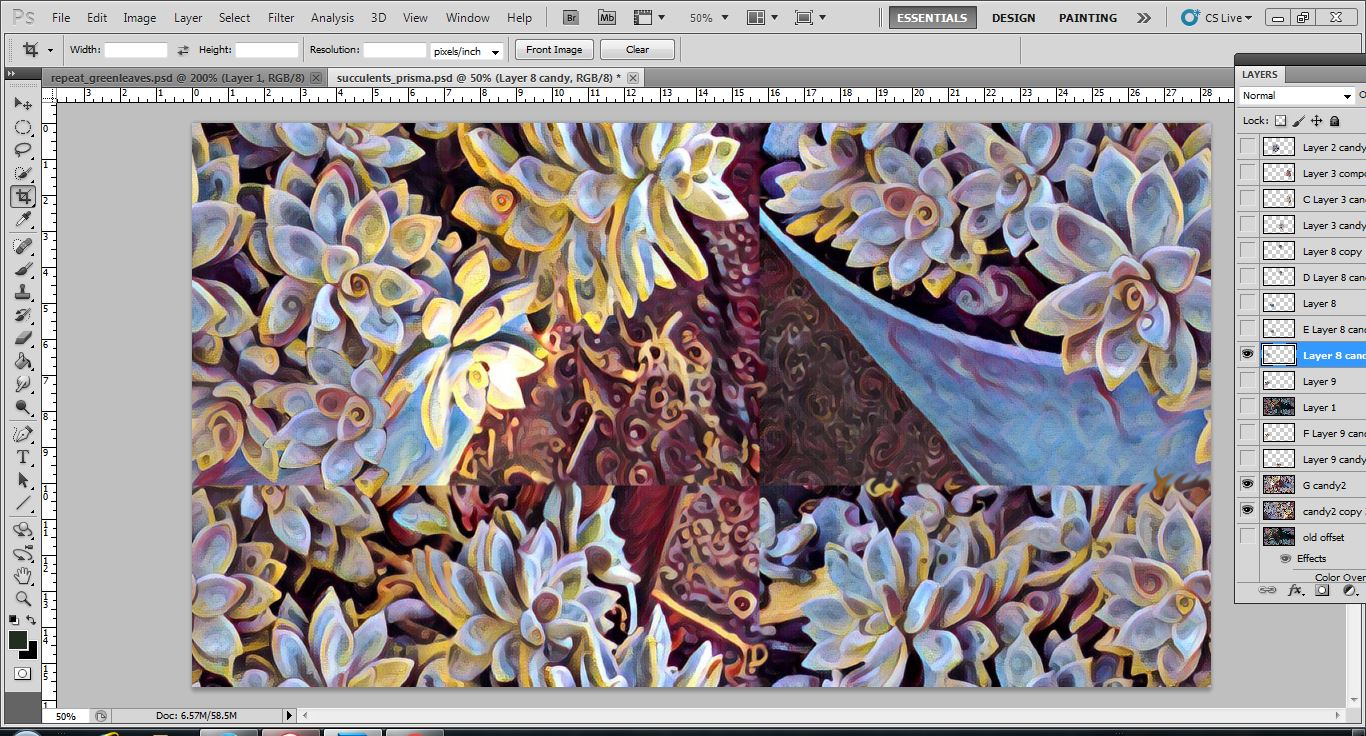
Using my new flower copies, I filled in the blank space in the center where the four corners meet. Then I used the Smudge tool to blend the four corners together.
I think it came out pretty well, don’t you?
Artistic Process – Where Cool Pillows Come From
I grew a few gray hairs creating this Cosmic Damask fabric pattern, but it was way worth it! From pencil sketches, scanning, and then repeat process. You’ll need some tracing paper for this, unless you prefer using a drawing app with a digital stylus.
First, I scoured the web for a nice old damask pattern. Here’s what a quick search might turn up — almost any of these will do the trick:

Now print out the damask pattern you just found. Print on regular paper, in a size that is easy for tracing.
Lay the tracing paper over the damask printout. Now this is where your artistic vision and skill come in! Think of a theme and start filling in the damask area with your own doodles, like mine below:
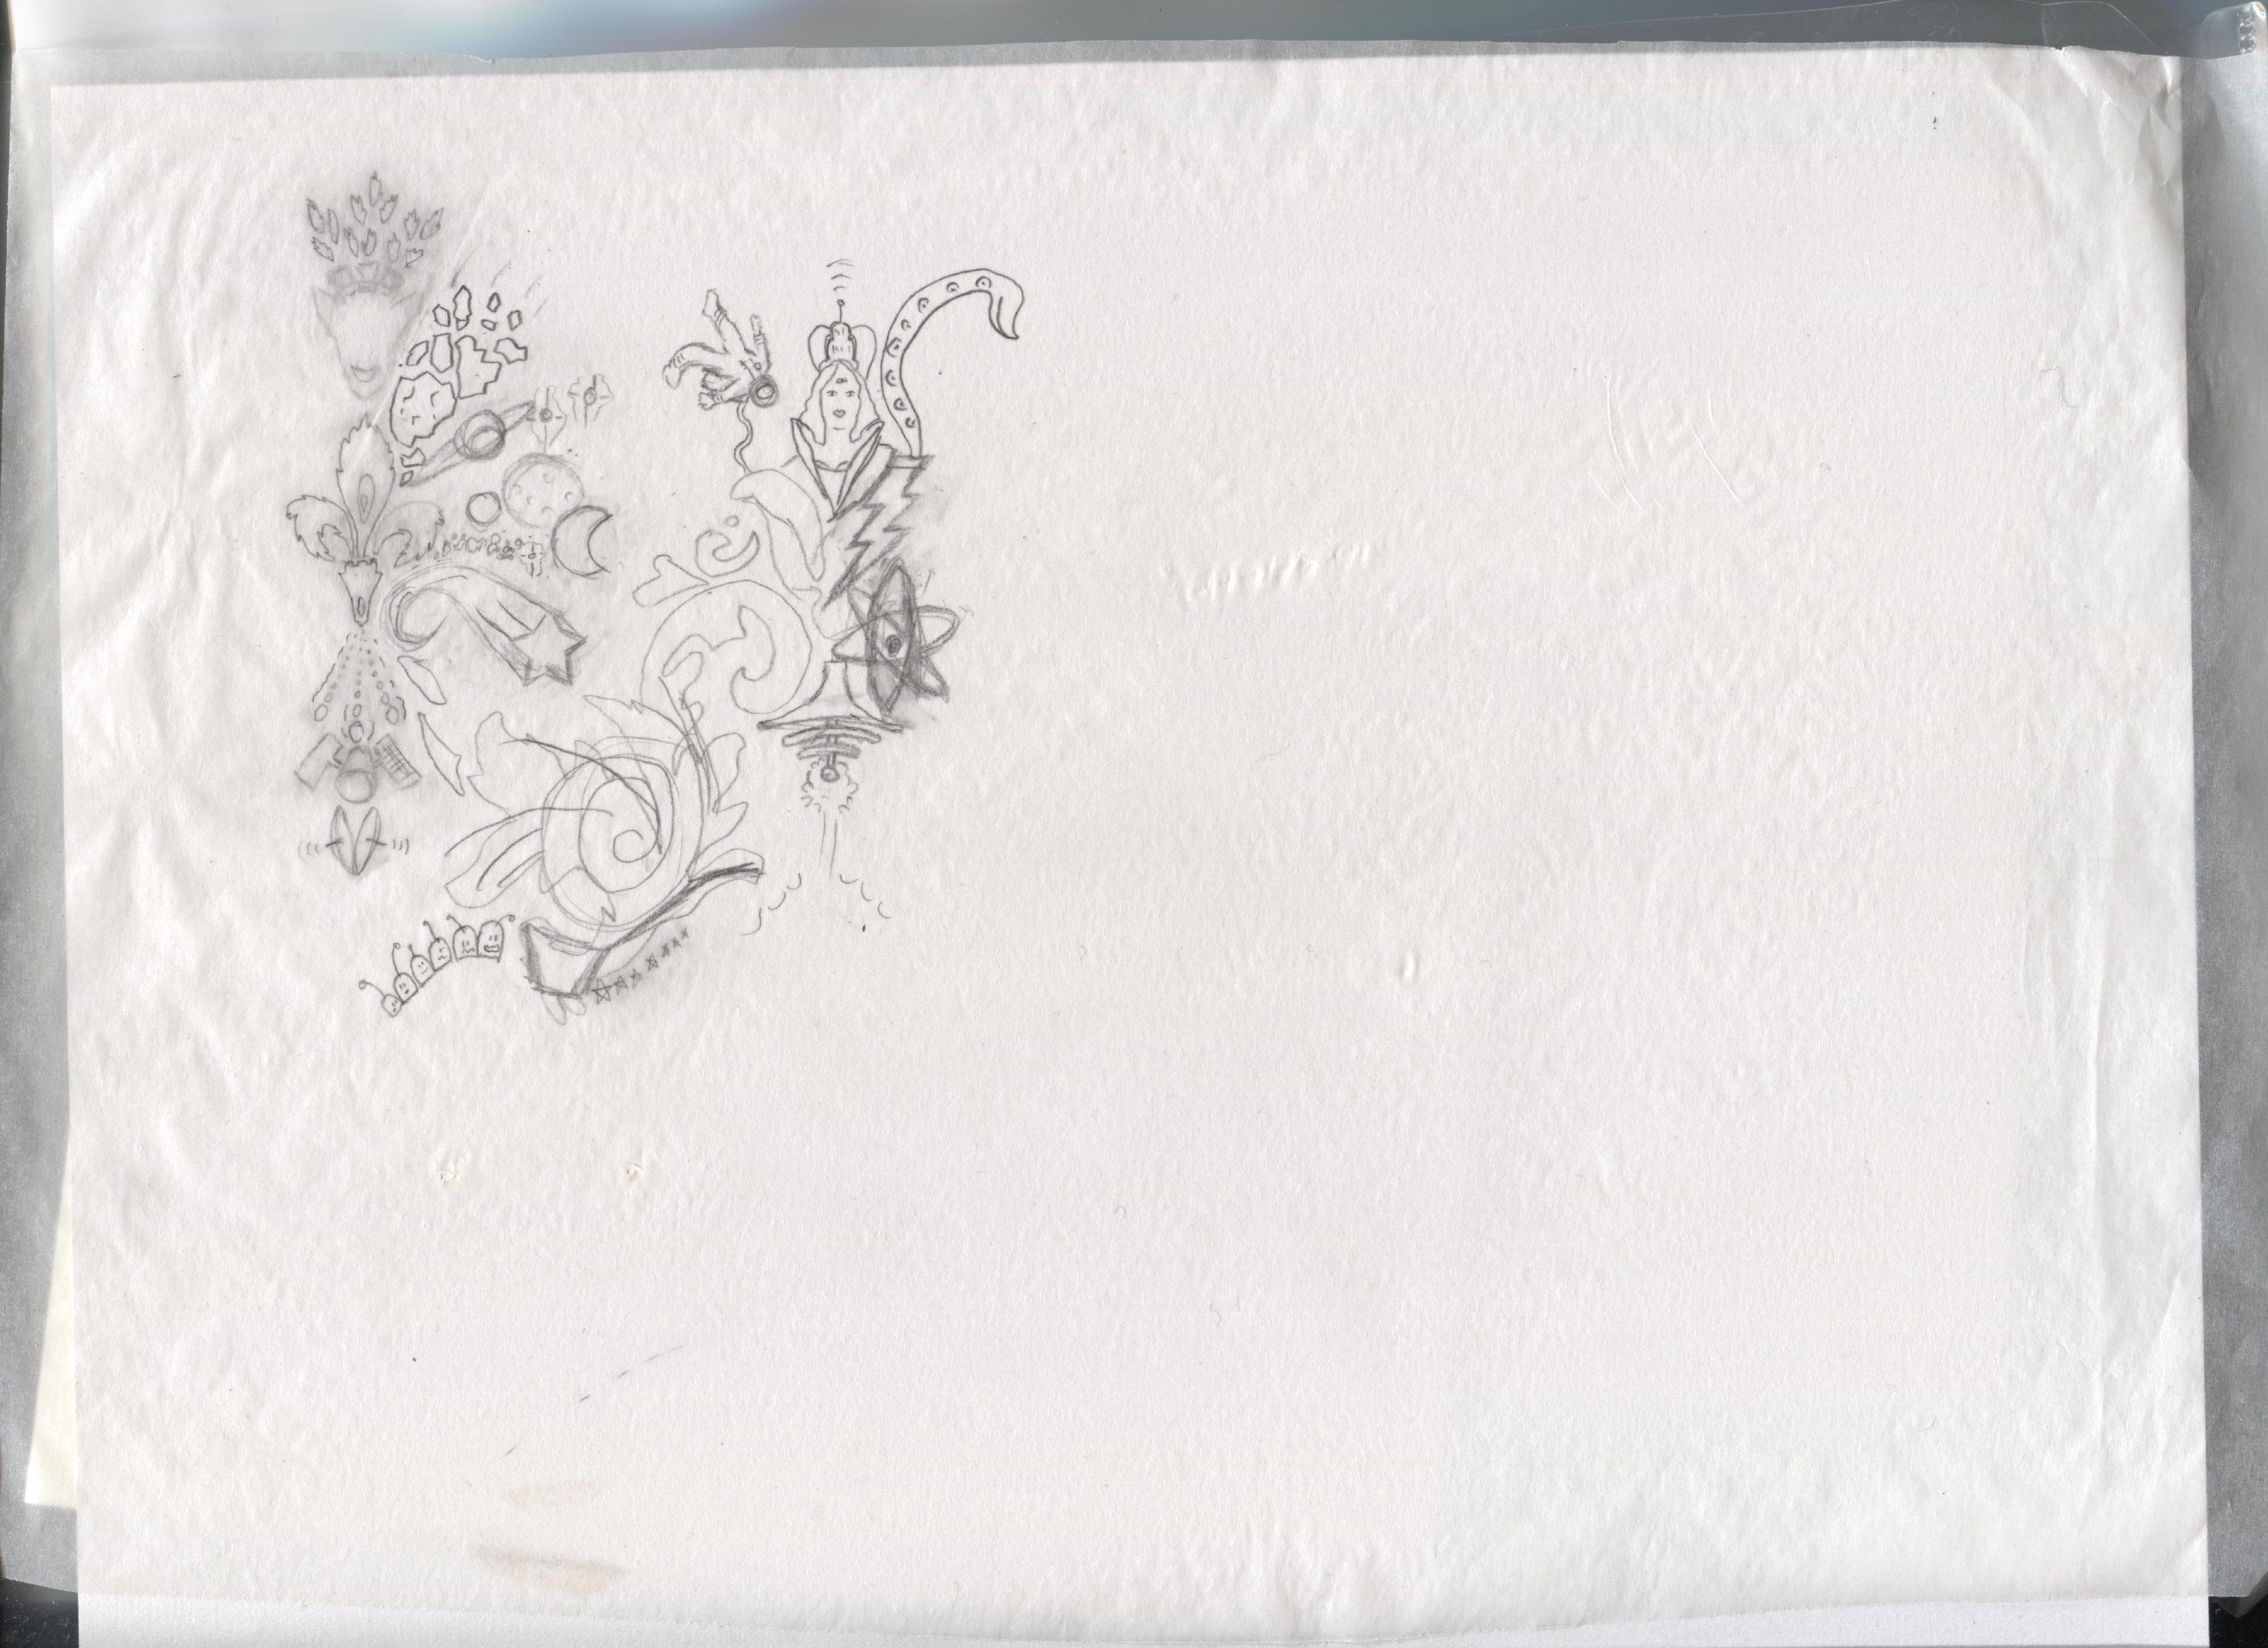
You can scan the tracing paper and continue to work on it in your photo editor software.

Or, you can do a repeat pattern by hand on paper, old school style. (madamchino on Instagram)

20% off!
Enter code JOUST20 at checkout for 20% my items at Redbubble ! I don’t know how long the RB sale will last, so check it out.
See below for the most unique gifts!

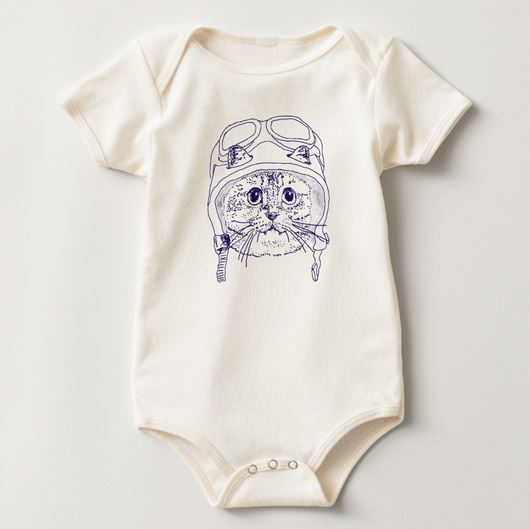
Moto Kitty Baby
UPDATE 7 June 2019: I’ve closed my Zazzle store due to their April 2019 change of policy. My Redbubble store is still open here: https://www.redbubble.com/people/studiozandra/portfolio/recent
Original baby wear by Zandra, fresh out now.
Don’t have a baby? Shop ALL the Moto Kitty STUFF: http://www.zazzle.com/collections/moto_kitty-119152128200030669
Shop ALL the Kitty FABRIC: http://www.spoonflower.com/collections/162257-all-teh-kittehs-by-zantoka