New tech blog!

So I decided to stop with the “Tech Tangents” already. I had an old blog years ago which was basically my Japanese practice notebook typed up and posted online. Last week while dealing with a friend’s tech support issue, I decided to write up my experience. Then, since I am a glutton for punishment, I decided to also write it up in Japanese. After I did that, I thought, “hey, remember your old Japanese blog? Post ‘er there!”

studiozBlogPost

From now on, I’ll endeavor to keep my techie stuff separate from my art stuff in this way. I think that forcing myself to write in both English and Japanese will keep me from getting too deeply involved in tech blog posts because of the level of difficulty. I also used my dad’s old domain name, dhrp.net , to redirect to my Blogger page:

dhrp.net

Tech tangent: Python on Linux — here we go!

Not even sure I should call this one a tangent, since I’ve been doing a lot more tech reading than drawing and designing lately. I thought I could turn my art into a side gig, eventually growing into a licensing income stream, but that hasn’t been working out. So maybe my other hobby, techie reading, will play out eventually…

With such an interest in tech in general, I decided to try learning Python again (I learned a few basic operations a few years back but not much beyond “hello world”.) Let’s see how long it will hold my interest this time!

Udemy had a $9.99 sale this week, so I bought the course “Complete Python Boot Camp: Go From Zero to Hero in Python”.

I decided, as I am wont to do, to go all in: try to complete the course on Linux instead of Windows. Getting stuck at jump, (“Course materials installation guide,”) prompted this blog post! The course uses Jupyter notebooks, and they recommend that newbies use something called Anaconda to install both Python and Jupyter. So I had to visit Jupyter.org on my laptop. After downloading the file Anaconda2-4.4.0-Linux-x86.sh , I of course tried to double-click it, and got this:

screenshot .sh file

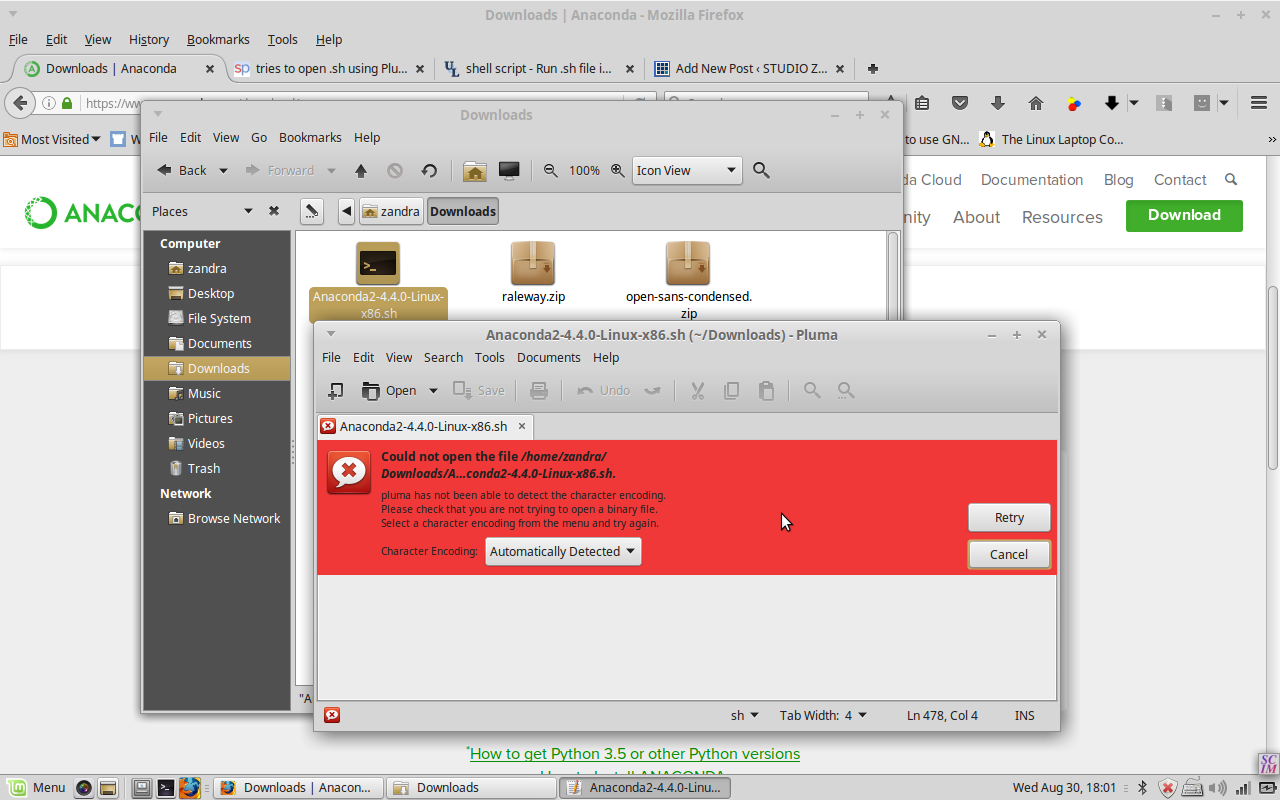
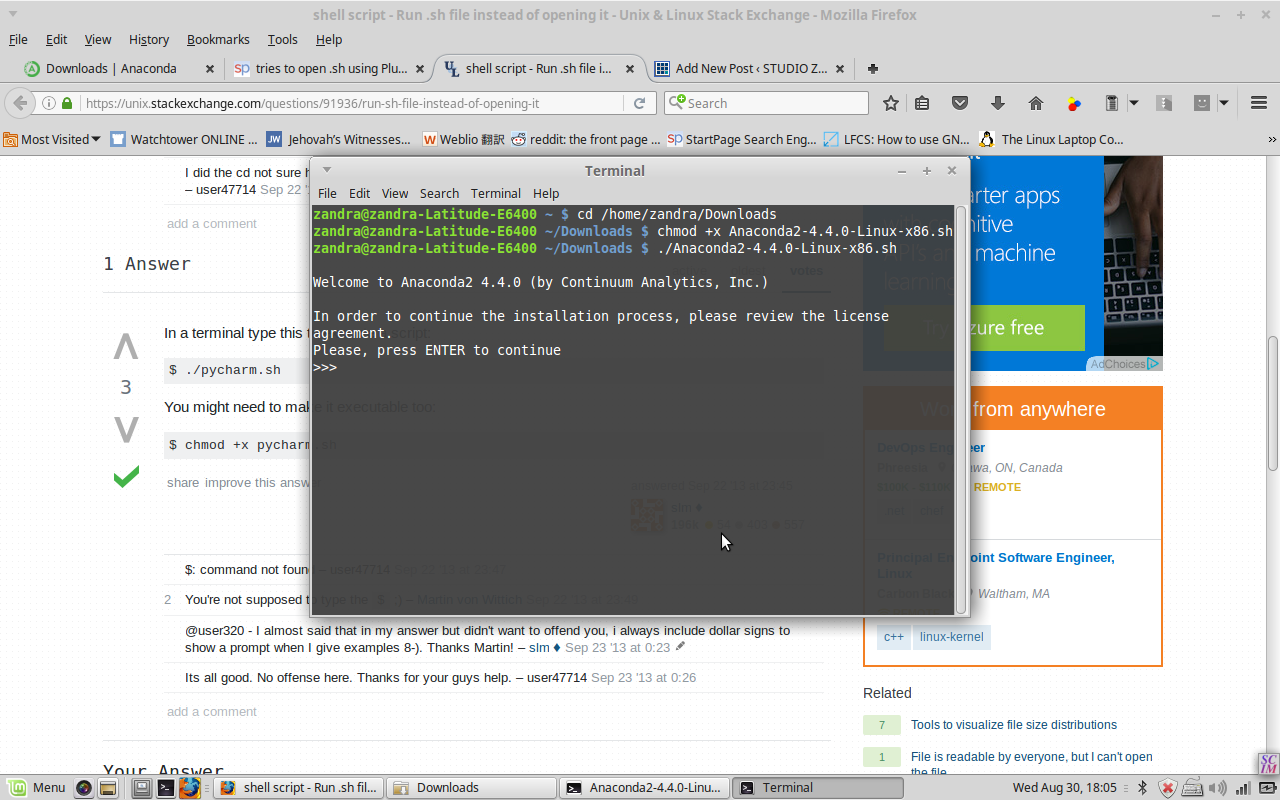
The text editor is tryna open it! So a web search brought me to StackExchange, where I learned that you have to manually run the .sh file from inside the correct directory in Terminal. Success!

screenshot terminal

So I entered ‘jupyter notebook’ into a new terminal window, it was very anticlimactic to just see a new browser tab opened with …a list of my local folders. But glad it’s finally done!!

It’s pretty easy to write commands in Python and then immediately run them by pressing Shift-Enter. And saving is easy as well. On to the next course module, I hope it doesn’t take as long as the installation took!

Tech Tangent: Installing the Bitpay Ecwid plugin with WordPress

Instructions for the layperson installing the Bitpay Ecwid plugin

After trying unsuccessfully to install this Bitpay plugin at my WordPress site, I decided to go with a simpler plugin from GoURL.io .  So while it is not the smooth solution I wanted and I now effectively have 2 stores, at least it is working and I can accept payments!
For anyone other artists out there who are not web programmers and want to accept Bitcoin using Bitpay on Ecwid, I can get you as far as getting the Bitpay option to appear on your Ecwid checkout page:


1. Backup your site, and make sure you have SSL enabled (you can purchase through your hosting service)
2. Download the zipped files for Ecwid Bitpay plugin from Github
3. Extract the compressed files and note the location
4. Log into your website’s hosting site and open the File Manager
5. Navigate to the folder in you site which contains your WordPress installation. Then open the sub-folder which has all your plugins, including Ecwid. It may be a location such as this: public_html/wp-content/plugins/ecwid-shopping-cart

cPanelFileMgr
6. Create a new folder there called “ecwid-plugin-master”
7. Upload the extracted files from Github into this new folder. (if you know how to FTP, you can also do that)
8. Open the “bitpay” folder, and then open “config.php” with your File Manager’s text editing feature.
Now you are ready to follow the instructions in the README file which was included in the files from Github to edit the config settings.

This is what you should see when you open the config.php file with a text editor. (I added my comments inside asterisks ***):

// ecwid settings
$storeURL = ”; // example: ‘http://www.example.com/ecwid/index.html’ ***fill in your store link between the single quotes***
$storeId = ”; // found in your ecwid control panel, bottom-right

// bitpay settings
// url of bitpay folder on your server. example: ‘http://www.example.com/ecwid/bitpay/
$bitpayURL = ”;
// apiKey: create this at bitpay.com in your account settings and paste it here
$apiKey = ”; // ex ‘DNboT9fVNpW7usAuDNboT9fVNpW7usAu’
// speed: Warning: on medium/low, customers will not see an order confirmation page.
$speed = ‘high’; // can be ‘high’, ‘medium’ or ‘low’. See bitpay API doc for more details.

//payment method settings
$login = ”; // see README ***generate a random string and paste here between the single quotes. You can use sites such as https://www.random.org/integers/***
$hashValue = ”; // see README ***generate a random string and paste here between the single quotes. You”ll need a third random string for the MDchecksum as well. Note these numbers in someplace where you can find it later, because you will need to enter them into Ecwid settings.***

// add trailing slash to url
$bitpayURL = preg_replace(‘#([^\/])$#’, ‘\1/’, $bitpayURL); ***This portion I don’t understand. I am still waiting to hear back from support@bitpay.com ,  if they ever get back to me, I’ll repost.***

Checkoutscreenshot
The above steps got me this far…you can see the Bitpay option appears
Checkoutscreenshot2
…but after clicking “Continue”, the next page generates an error.

Tech Tangent: Dual booting Linux on an old HP Mini 2140 netbook

Now for another one of those enjoyable digital tangents I go off on every now and then. I was asked to install Linux on a bunch of old HP 2140 netbooks to add a bit more life to them. Because it’s the distribution I’m most familiar with, I tried installing Ubuntu 14.04.3 LTS 32 bit, but it was still very glitchy, and I had problems installing the wireless drivers even though I had researched and downloaded them in advance. Next I tried Linux Mint 17.3 Rosa 32 bit, Mate version. (Thanks to some vigilant YouTube commenters, I found out that Mate is pronounced MAH-tay, as in yerba mate.)

Mint installer is actually easier and faster than Ubuntu, and zero problems installing the Broadcom 802.11 drivers (thanks to this site).  I downloaded the drivers here: https://launchpad.net/ubuntu/+source/bcmwl/6.30.223.248+bdcom-0ubuntu8/+build/8305301

I used a USB stick to install, since the HP netbook doesn’t have a CD drive. I made my own using a small application called YUMI from pendrivelinux.com . But you can also order a pre-installed USB stick from a company called OSDisc.com . Mint prefers you connect to the internet while installing, but this is not necessary — just install the Broadcom drivers after installing and restarting once.